Java电商
Last updated
Dec 4, 2023
# 导学&资料
# 一个大型电商的架构
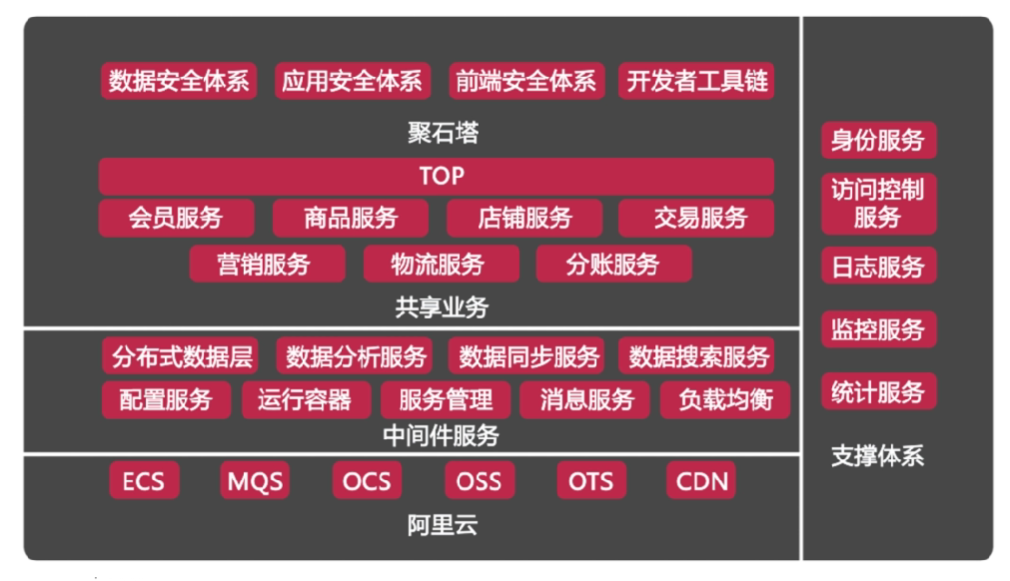
找工作的季节之简历及找工作的分享_慕课手记
《Java从零打造企业级电商实战-服务端》思维导图&知识点索引&温馨tips_慕课手记
happymmall课程QQ群分享手记_慕课手记
happymmall课程QQ群分享手记_慕课手记
# 邮箱注册验证的思路
数据库表设计:
账号ID,邮箱,生成的随机激活Key,有效验证时间
发送邮件(SMTP协议之类,邮件格式为HTML),
附带一个A标签的链接地址:
http://XXX.XXX.XXX/XXX.XXX?id=账号ID&key=特定的Key
用户点击链接,后端代码处理:
验证时间、ID、Key是否有效,将邮箱保存到用户的信息表里去,完成。
在数据库设一个 status, 验证前是锁定的, 验证后邮箱可以使用
链接
# 大型项目架构演进
推荐书: 大型网站技术架构核心原理与案例分析
大型项目架构演进过程及思考的点_慕课手记
- all in one 服务器, 包括 app, file, database 都放一个
- 拆分服务器, app 的服务器性能强点, 数据服务器容量大点
- 增加缓存服务器, app 的本地缓存
- 增加负载均衡调度服务器
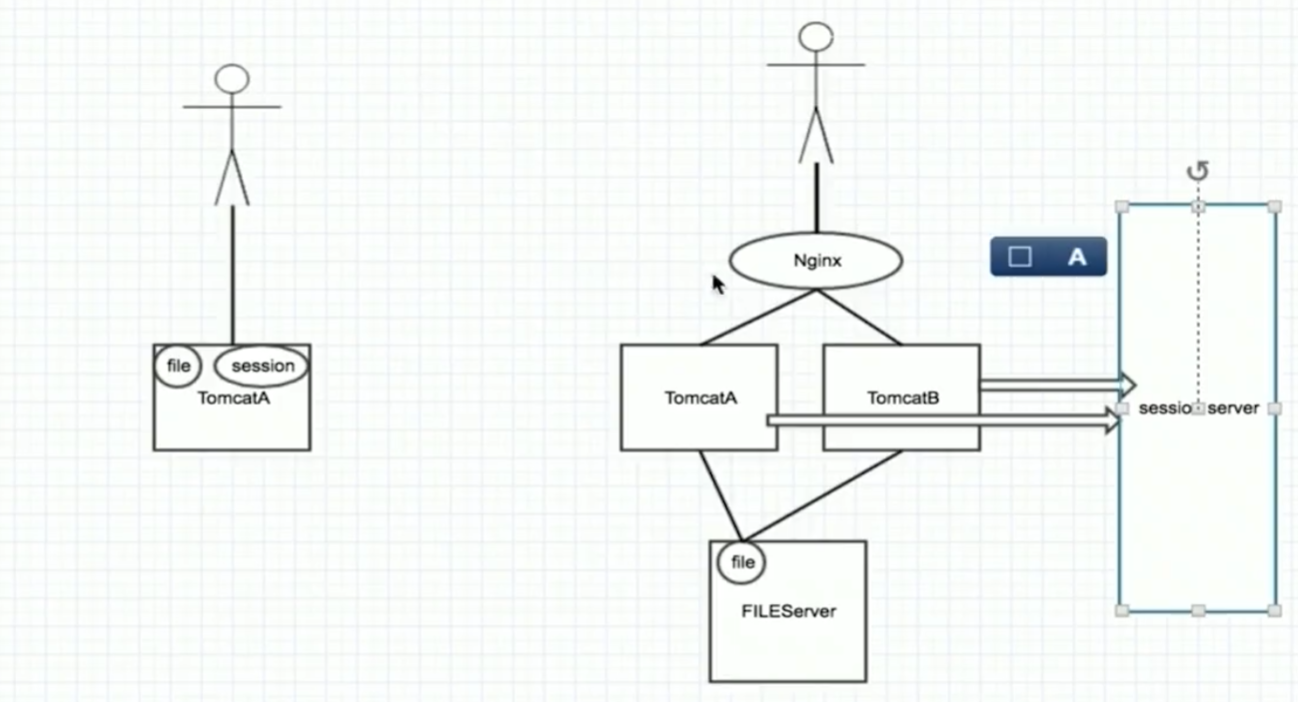
- Session管理, 方案:
- Session Sticky 粘滞会话
- Session 复制
- Cookies
- Session 服务器
- 数据库读写分离
- 反向代理和 CDN
- 分布式文件系统
- 数据垂直拆分, 专库专用, 如 Products, Users
- 数据水平拆分, Users 拆成 User1, User2
- 拆分搜索引擎
# 环境配置
# jdk
# tomcat
Apache Tomcat® - Apache Tomcat 10 Software Downloads
Tomcat 配置
# maven 安装配置
Maven 安装配置
项目里说到的 Settings 是 /conf/settings
# FTPserver
这个似乎是个私人小软件, 不是 Apache 的 FTPserver. 开箱即用
MS Edge, Firefox, Chrome 都不支持 ftp 了, 现在要用 File Explorer 访问 ftp
# Nginx
Nginx
win 直接下载压缩, 在 /drivers/etc/host 配置 host
在 conf.d/*.conf 下配置单个文件
# image 配置(目录转发型)
配置 conf

在 hosts 添加 二级域名
在 win 下需要修改各路径, 注意用反斜杠
# tomcat 配置(端口转发型)
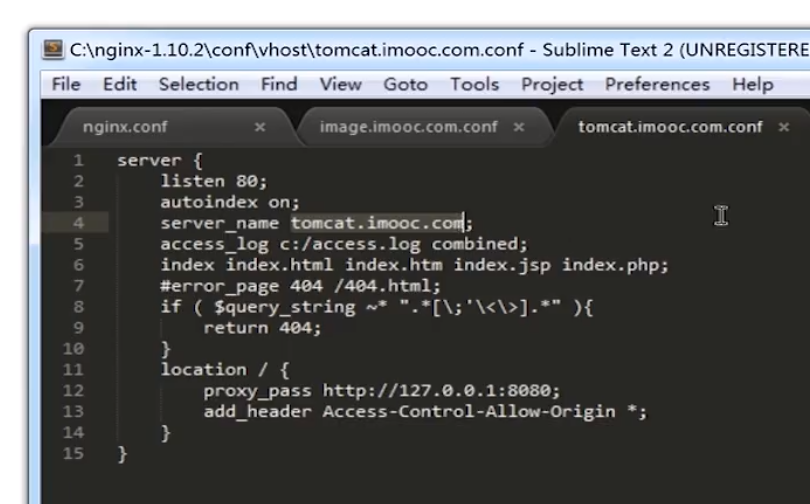
然后启动 tomcat
# 文件服务器搭建
根据以上两种 nginx 配置, 加上 apache 的一些 ftp 文件上传 API
# MySQL 安装配置
Linux: 安装, 字符集配置, 自启动, 防火墙
Windows: 下载安装, 字符集配置
MySQL#安装和初配置
项目用的 MySQL 5.1.73
1
2
|
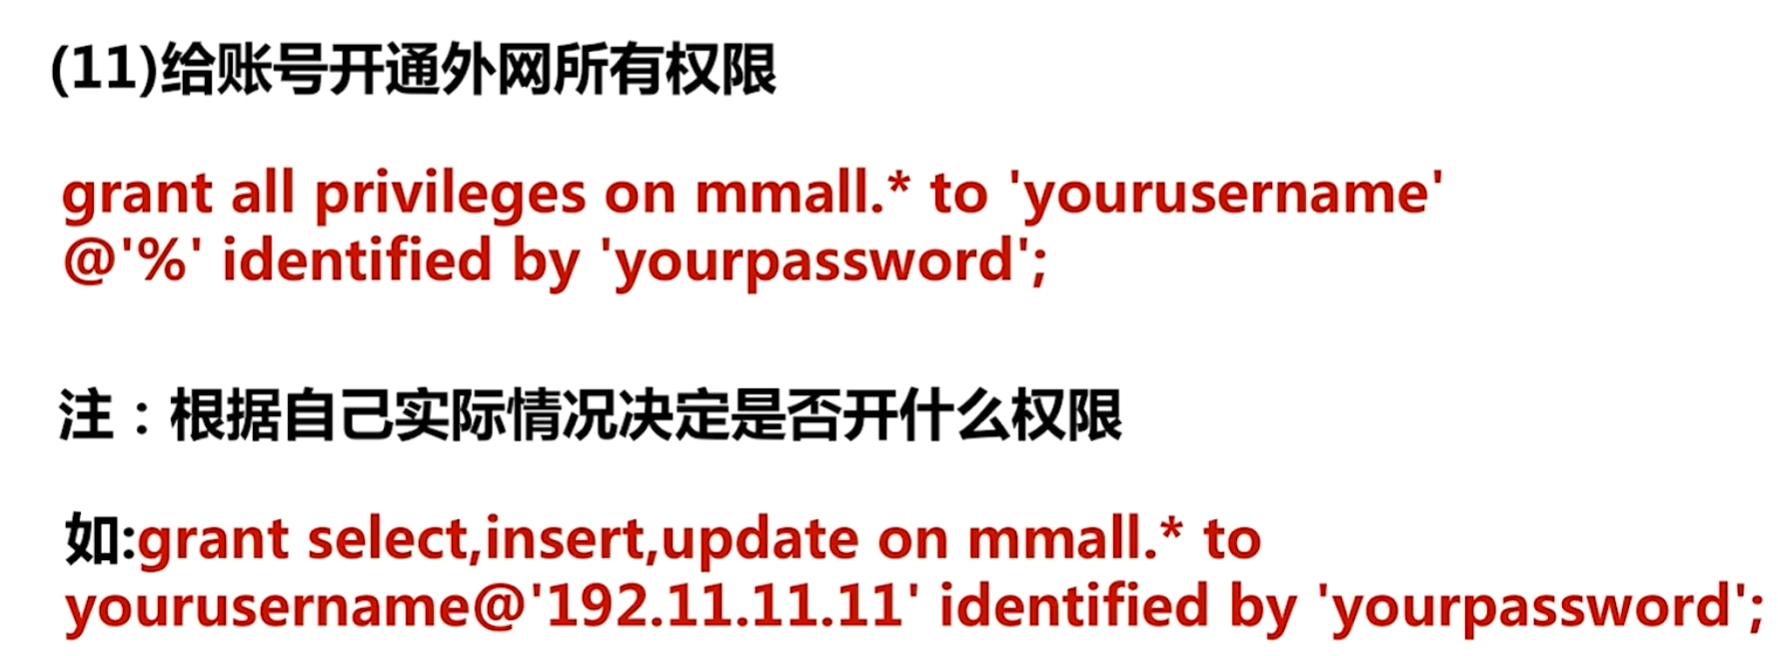
/* 本地用户赋予所有权限 mmall.* 是指这个数据库下所有 table */
grant all privileges on mmall.* to yourusername@localhost identified by 'yourpassword';
|
# 数据表设计
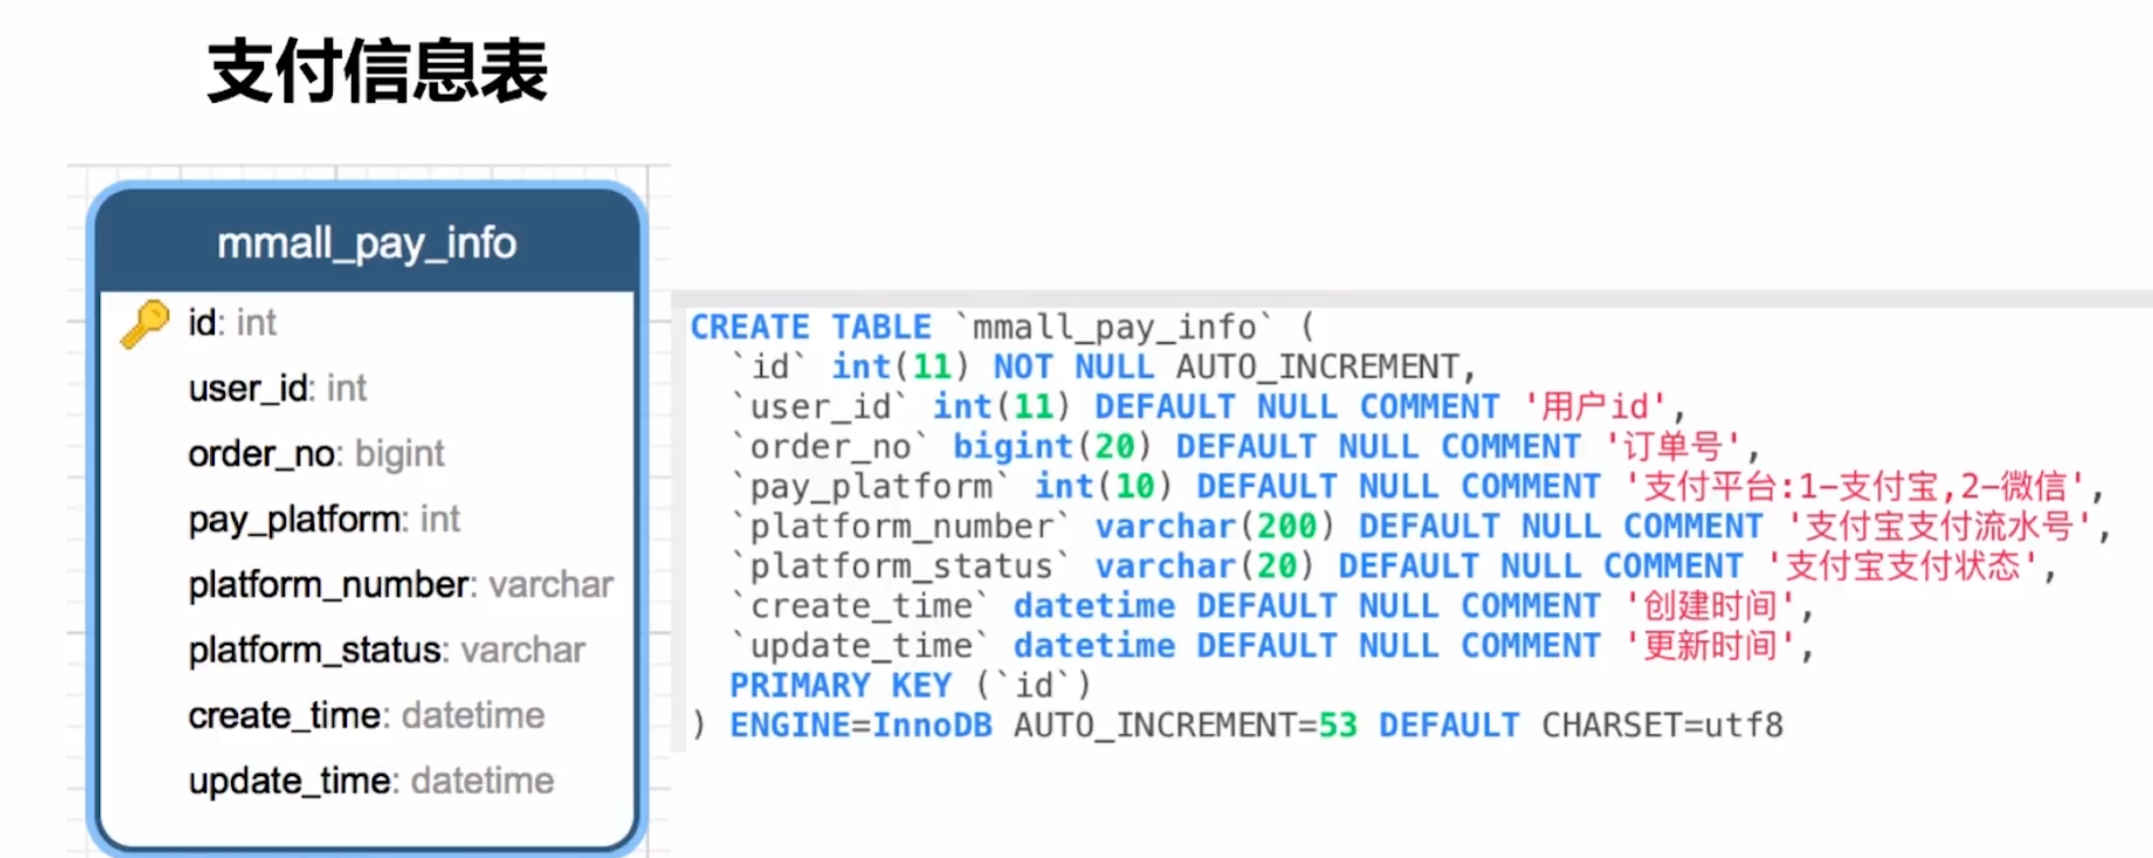
没有使用外键和触发器, 因为拓展修改和数据清洗麻烦
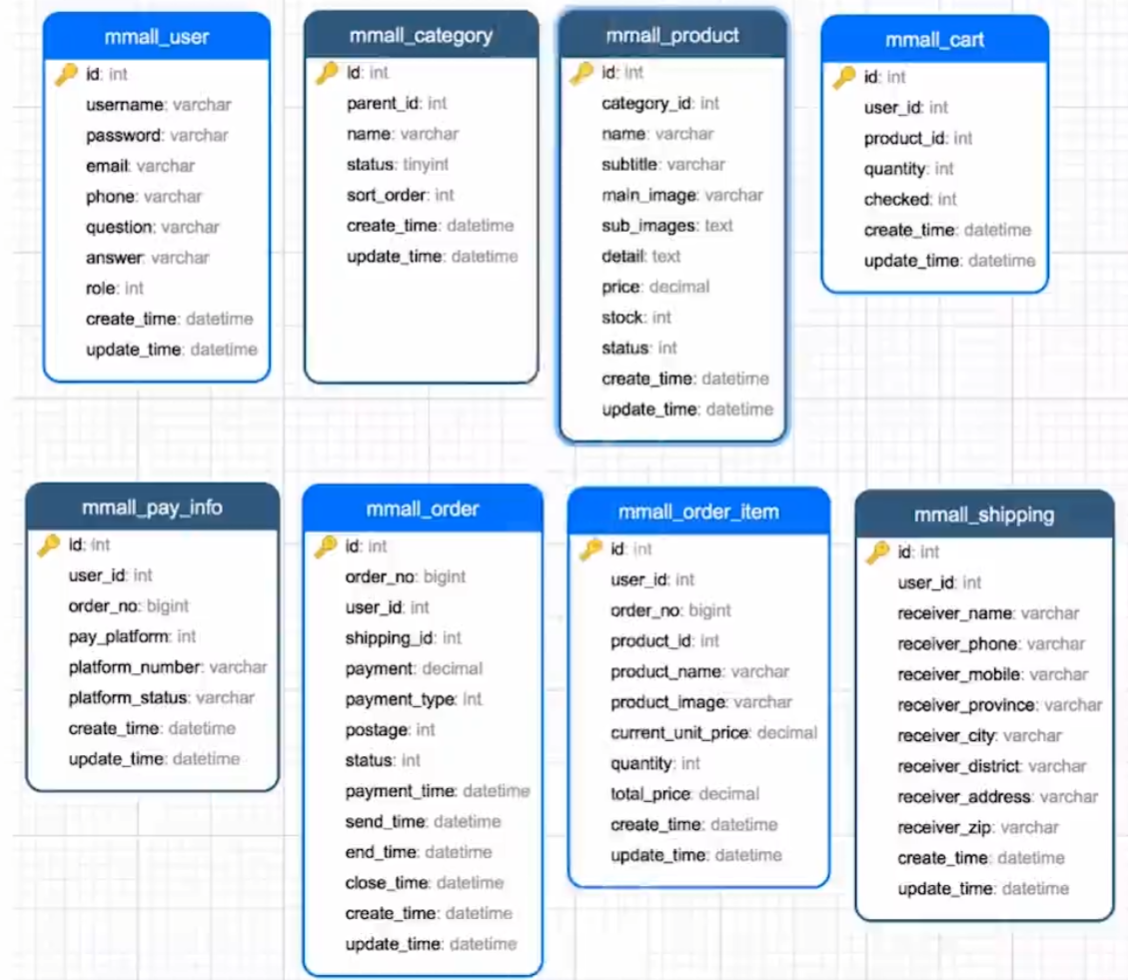

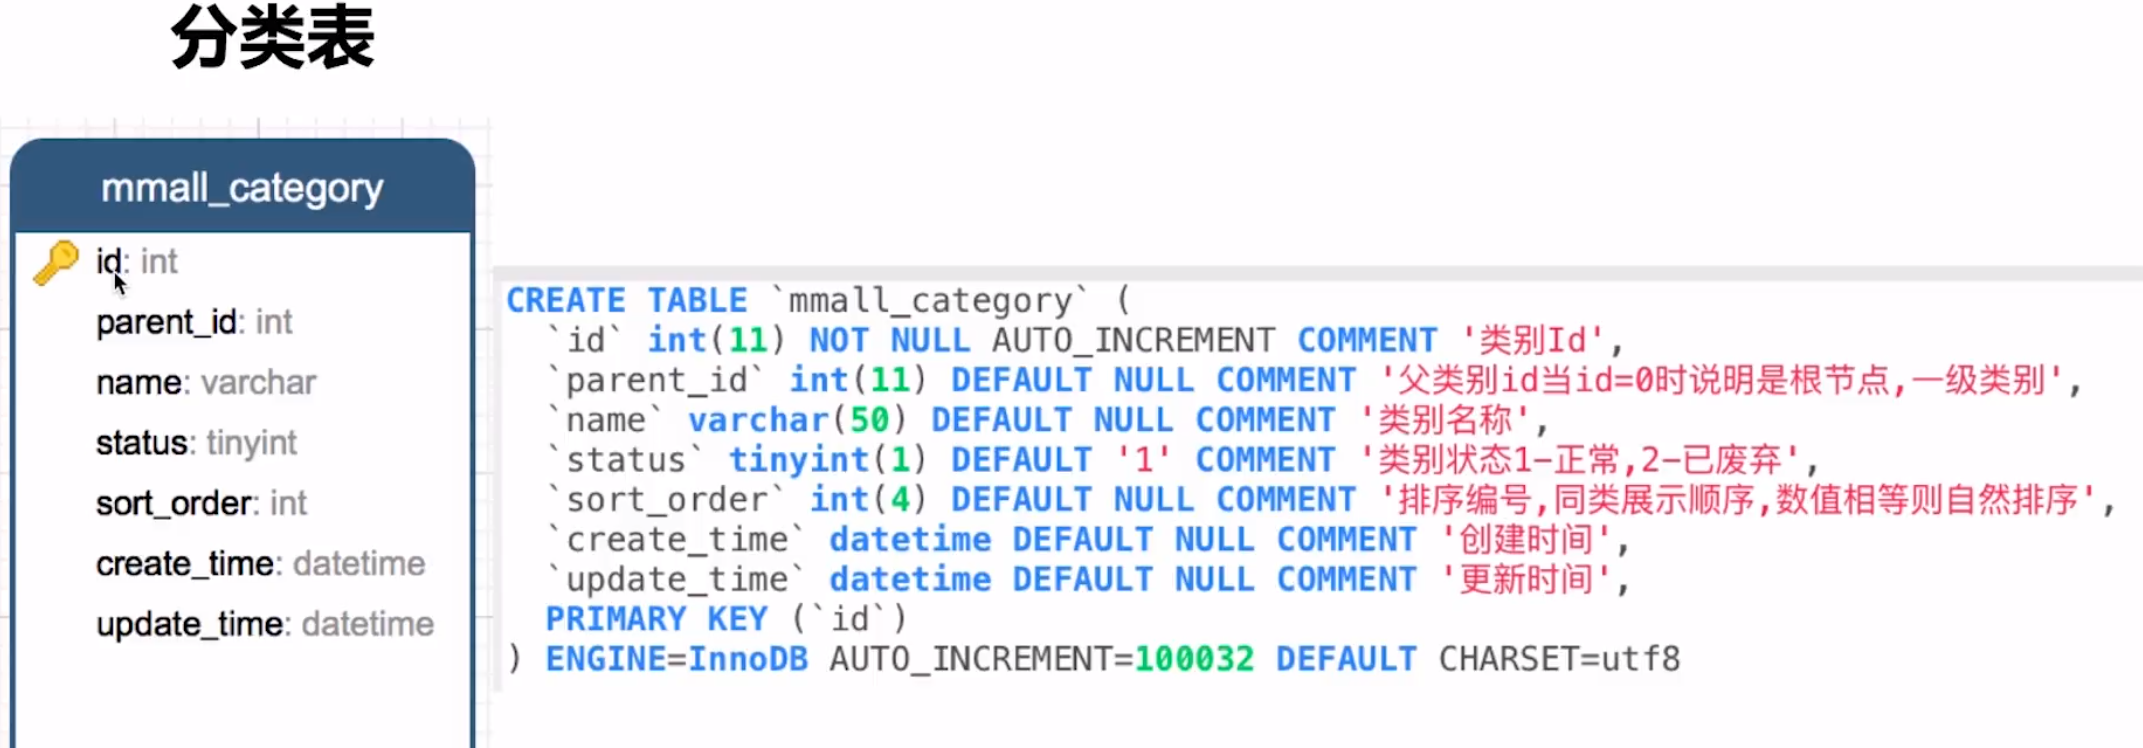

- text 比 varchar 长很多, 如果作了 url 长度限制, 也可以用 varchar

- 一项应该是某个用户购物车里的一条商品信息
- 加了 user_id 的索引来提高效率


# 项目初始化和配置
# 项目初始化
IntelliJ 需要配置 JDK, Maven, tomcat
Maven 安装配置 沿用了 erpcrm 的 settings
创建项目
- 用 maven 的 archetype
org.apache.maven.archetypes:maven-archetype-webapp
- 创建好了在 main 目录下创建 java 目录并标记成 src root; 在 src 下创建 test/java 标记为 test root
然后在 Run/Debug Configuration 增加 tomcat server 配置
- 如果没有找到要先装 plugin
- 选择 tomcat 根目录
- 端口改成了 8088
- run, 然后 8088 就可以看到 hello world 了. 此时还能在
\webapps\ROOT 看到 index.jsp (JSP文件)
# Git 配置
在 github 创建一个仓库
在本地项目创建 readme.md 和 .gitignore
 1
 2
 3
 4
 5
 6
 7
 8
 9
10
11
12
13
14
15
16
17
18
19
20
21
22
23
24
25
26
27
28
29
30
31
32
33
34
35
|
*.class

# package file
#*.jar
*.war
*.ear

# kdiff3
*.orig

# maven
target/

# eclipse
.settings/
.project
.classpath

# IntelliJ IDEA
.idea/
/idea/
*.ipr
*.iml
*.iws

# temporary file
*.log
*.cache
*.patch
*.diff
*.tmp

# system
.DS_store
Thumbs.db
|
Git#将本地仓库上传到 remote
然后创建一个新的分支用于开发, 并推送分支到远程git push origin HEAD -u
# 数据库初始化
教程用的 Navicat, 太贵了, 我用的 DBeaver
mmall.sql 文件可以在慕课的代码仓库找到
我的 3306 是一个 8.0, 3307 是一个 5.7
这个项目用在 5.7
# pom 配置
直接复制了, 建议熟悉各个包后可以再来看看
maven-compiler-plugin 报错, 加上 <version>2.3.2</version> 就可以了
还需要配置一下 extendir, 因为中央仓库没有的包放在项目里
实操了一下配 jedis
配置 pom 的方式是
pom 在实际开发中, 是用到一个配一个的
# java 结构
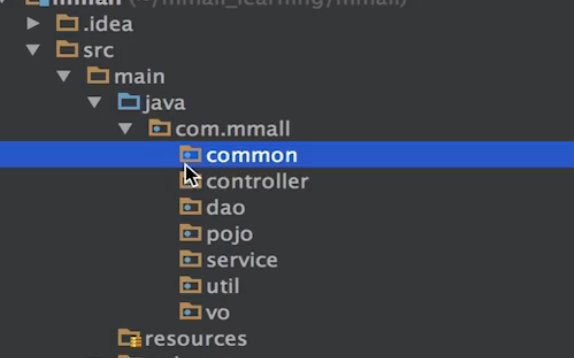
- common 常量
- controller 控制层
- dao 数据库
- pojo 数据库对象
- service
- util
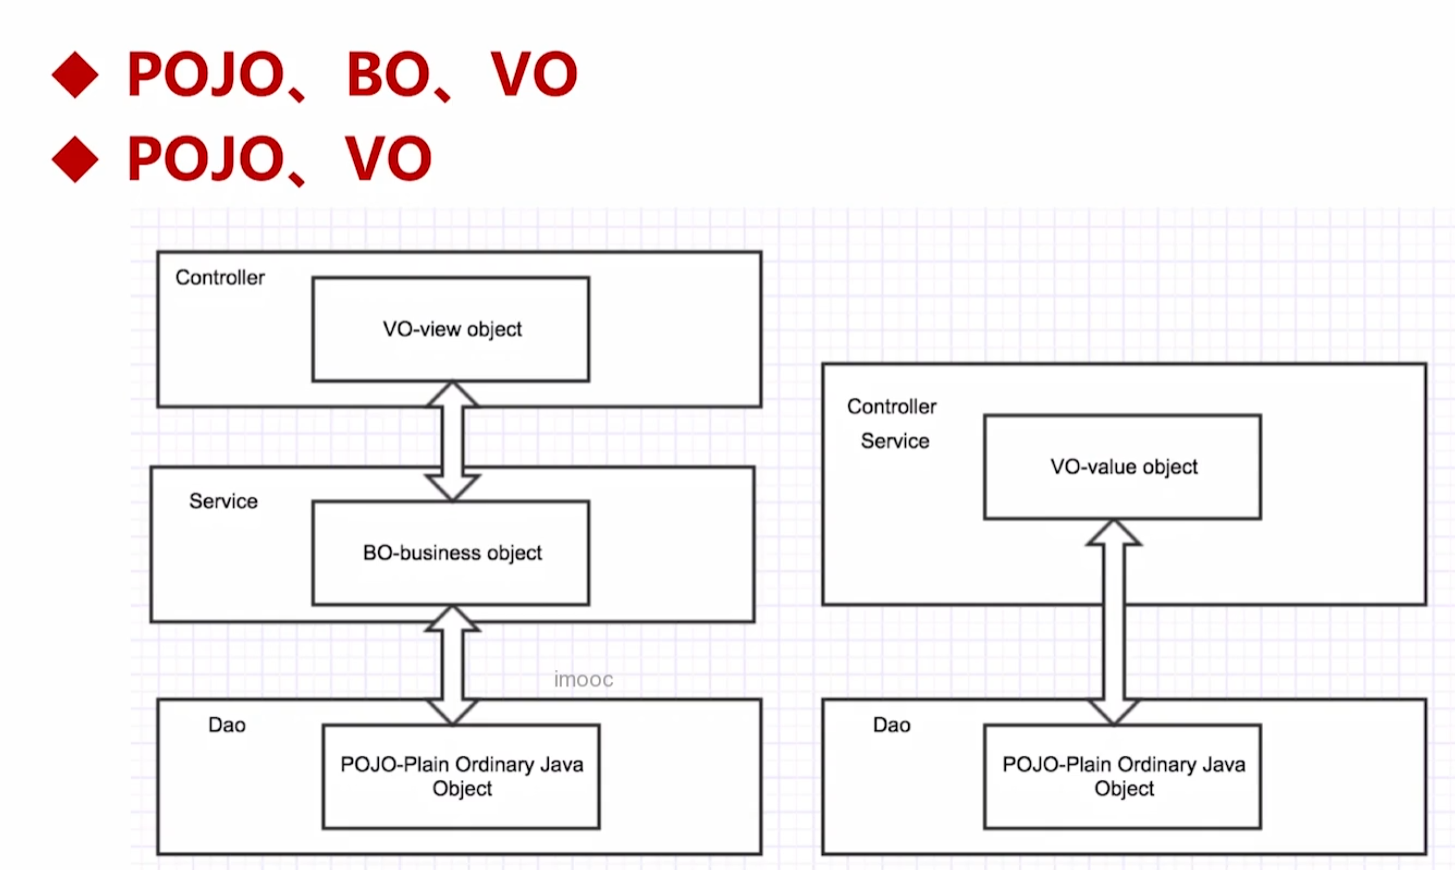
- vo =view object
dao 层跟 db 交互, 中间是 service 层, 交给 controller
pojo 是数据库对象, vo 封装, 再交给 controller 展示
# Mybatis
# Mybatis-generator
根据数据库自动生成 pojo 和 dao 和对应的 xml 文件
MyBatis Generator Core – MyBatis Generator Quick Start Guide
使用 MBG 需要配置 generator.xml, 如果涉及到变量, 还需 datasource.properties(这是自己命名的文件, 导入了)
需要的 mysql driver 包在 源码 tools 文件夹下

然后在右边 maven, 找到 mbg, 双击执行, 需要一个有权限的 mysql 用户.
BUILD SUCCESS 之后 dao 层 pojo 就会出现内容, resources.mapper 也有很多 xml
# 时间戳优化
将 createTime 和 updateTime 的处理交给 mysql 内置函数
具体做法是将 xml(也就是 java 转 sql 代码) 中,
- create 函数的 createTime 和 updateTime 都交给 now() 处理
- update 函数的 交给 now()
# Mybatis-plus
直接搜索 Mybatis-Plugin 搜不到了, 用这个
安装 | MyBatis-Plus
效果是在 dao 层增加了新方法后可以直接在 xml 添加模板
# Mybatis-PageHelper
pagehelper/Mybatis-PageHelper: Mybatis通用分页插件
商品翻页的时候会用上. 在 pom 加载就行
源码的 array 报红, 去掉就行了
重要提示: 只有紧跟在PageHelper.startPage方法后的第一个Mybatis的查询(Select)方法会被分页。
PageHelper 应当在执行 select 前设置完(如 PageHelper.orderBy())
# Spring
Spring Framework 官方
用例
把这 5 个直接复制来了(实际上是上面几个用例了复制过来改)

# Web.xml

# applicationContext.xml
主配置

配置注解: 在Spring配置文件中配置扫描除@Controller以外的注解类, 在SpringMVC中配置只扫描带@Controller的类

数据库建议配置
1
2
3
4
5
6
7
|
db.initialSize = 20
db.maxActive = 50
db.maxIdle = 20
db.minIdle = 10
db.maxWait = 10
db.defaultAutoCommit = true
db.minEvictableIdleTimeMillis = 3600000
|

pageHelper 的配置红了, 在官方 github 找到新的一个写法
abel533/Mybatis-Spring: 这是一个集成了Mybatis分页插件和通用Mapper的示例项目
但好像去掉 array 就行了
然后还有配置扫描和回滚, 不多写了
# dispatcher-servlet.xml
Spring-MVC 的配置
这个xml是默认的名字, 可以通过在 web.xml 里添加 init-param 节点, 修改 XX 改


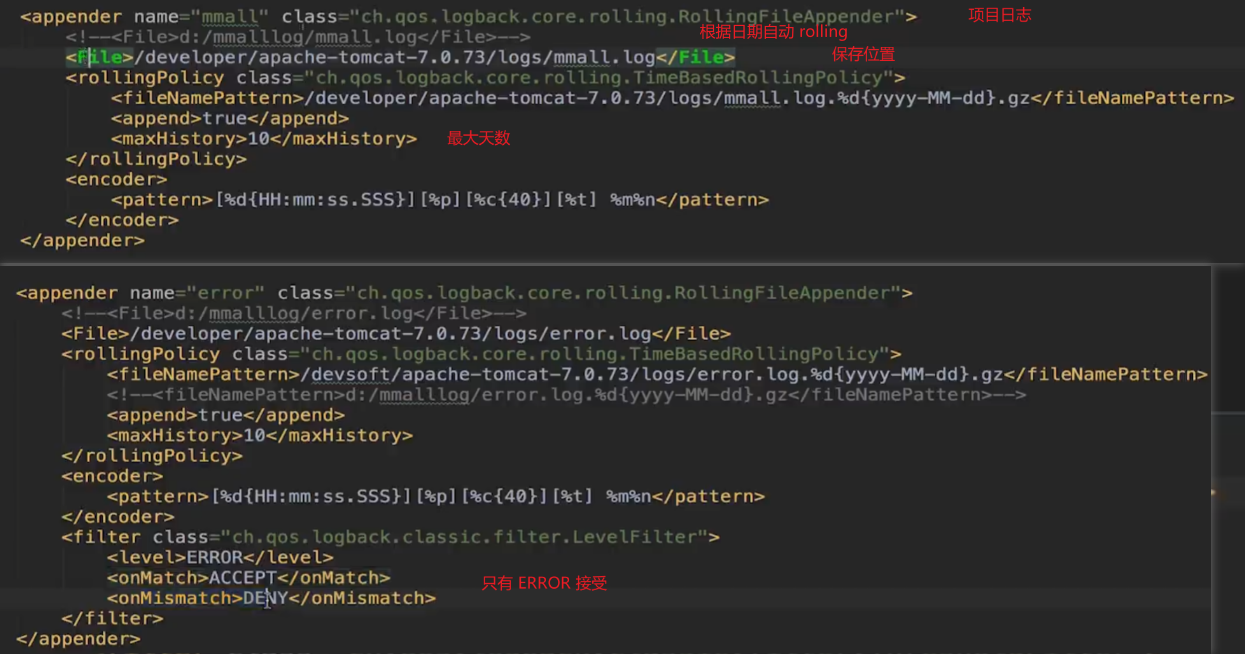
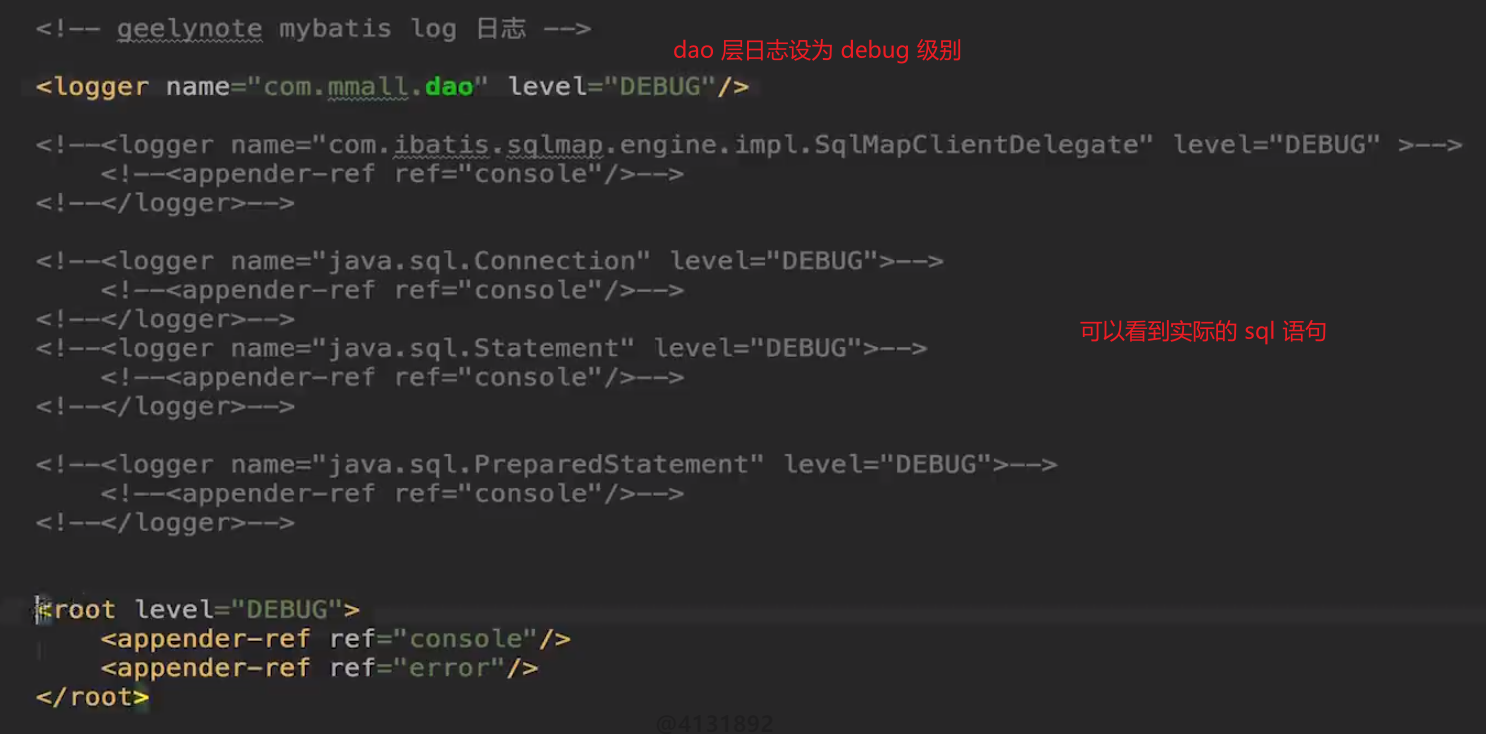
# logback 配置
直接复制
 catalina.out 和 catalina.log 的区别和用途_.out是什么日志-CSDN博客
console 所以打印到 catalina.out

# ftp 配置

# idea 注入和自动编译
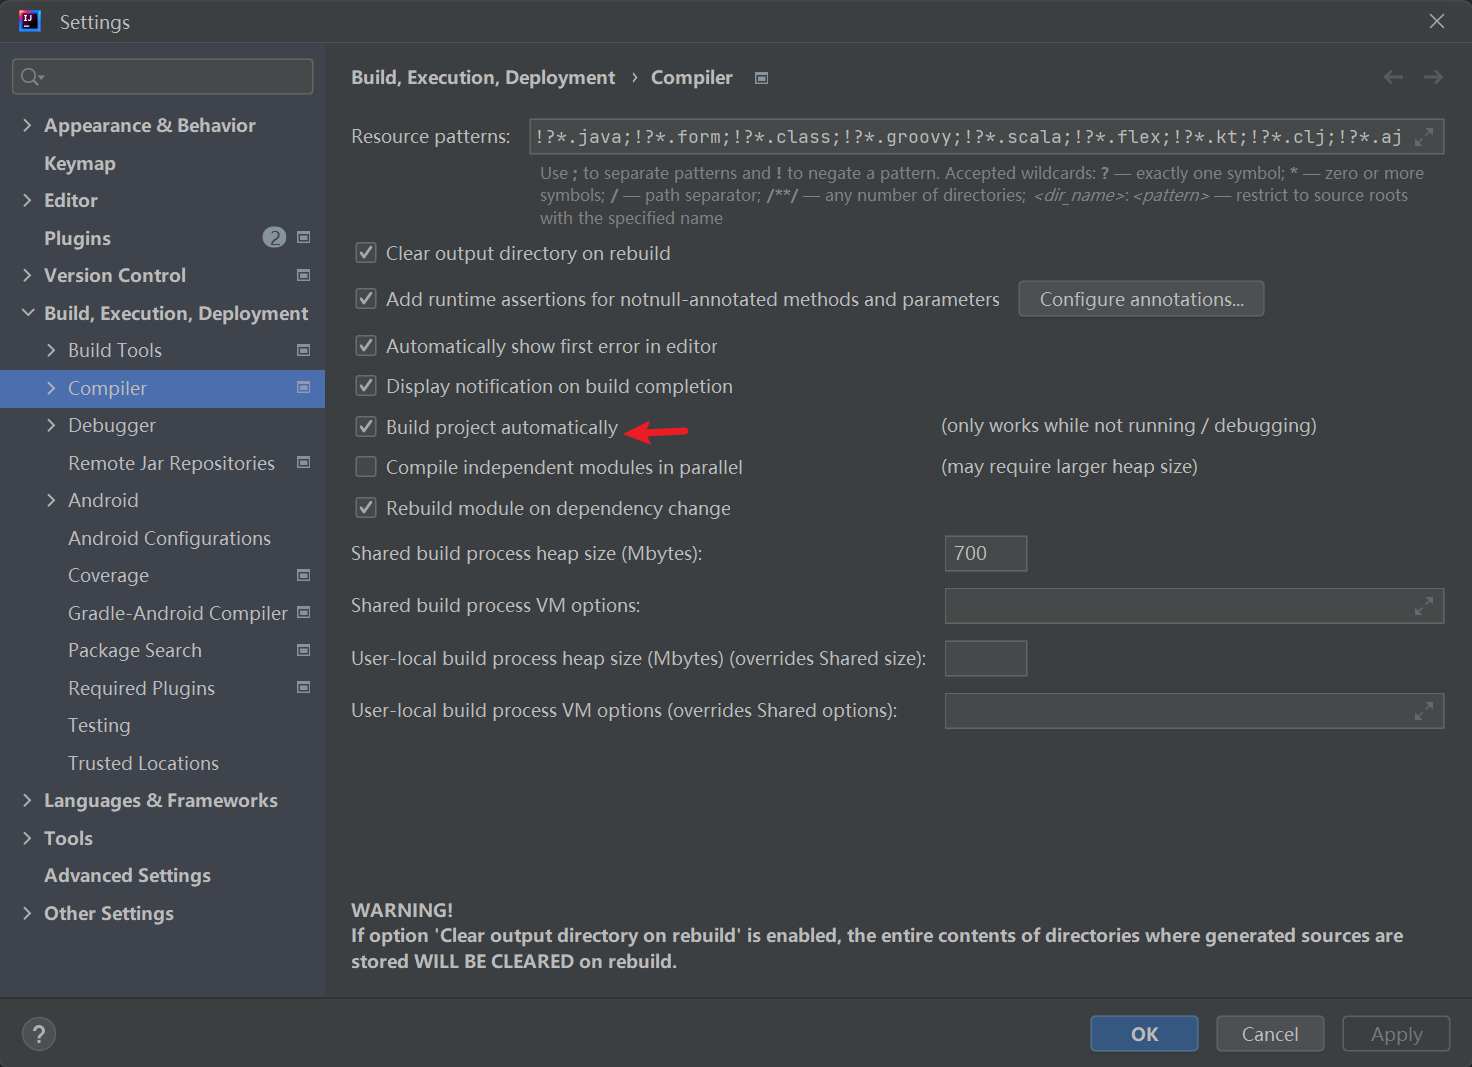 实时 build, 可以在下方 problems 看到实时的问题
配置结束了上传 git 吧
然后介绍了 fehelper 和 Restlet Client 插件, 后者和 postman 差不多, 就用 postman 吧
# 用户模块开发
# 一些公用的东西
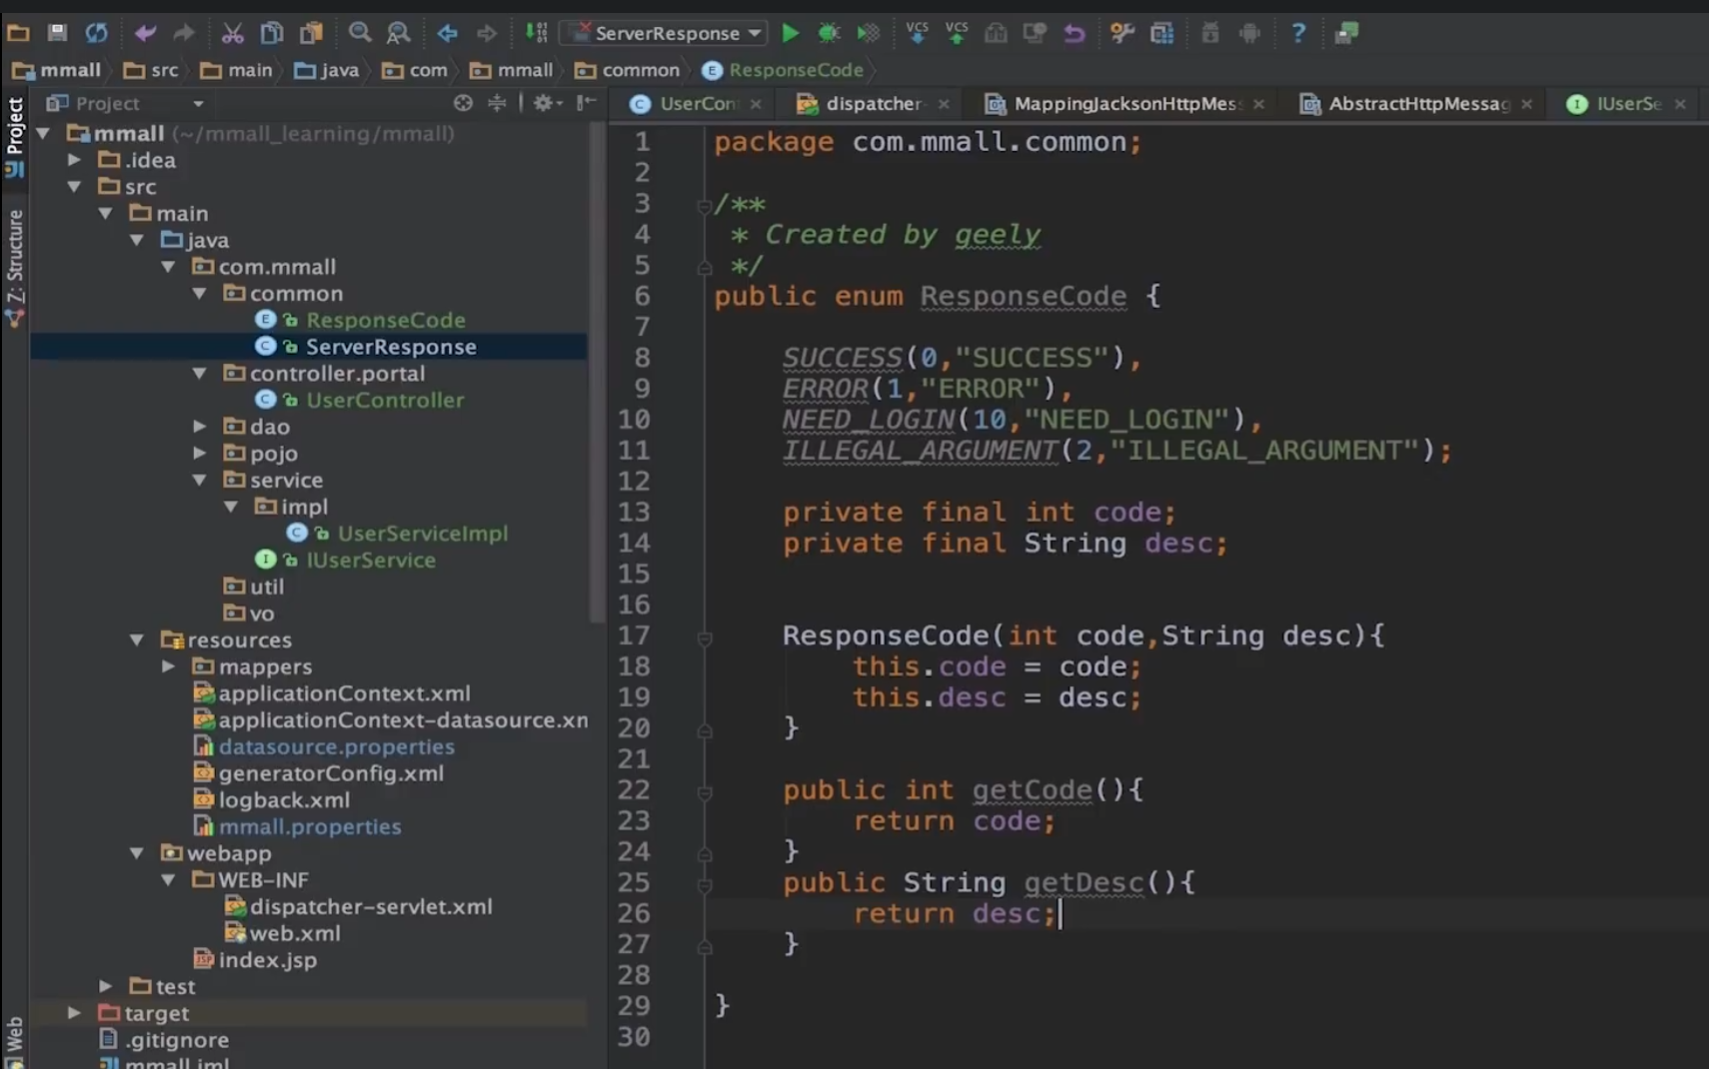
# ResponseCode
# ServerResponse
common 包下的类 ServerResponse<T>, 用来封装响应, impl Serializable
加上注解
@JsonSerialize(include = JsonSerialize.Inclusion.NON_NULL)
保证序列化 json 的时候, 如果是 null 的对象, key 也会消失
alt+\ 智能感知, 显示注解里可以添加的属性, 有的是 tab+space
构造器

判断成功的方法, 加上注解不会被 json 序列化

再加上三个属性的 getter
成功时的调用
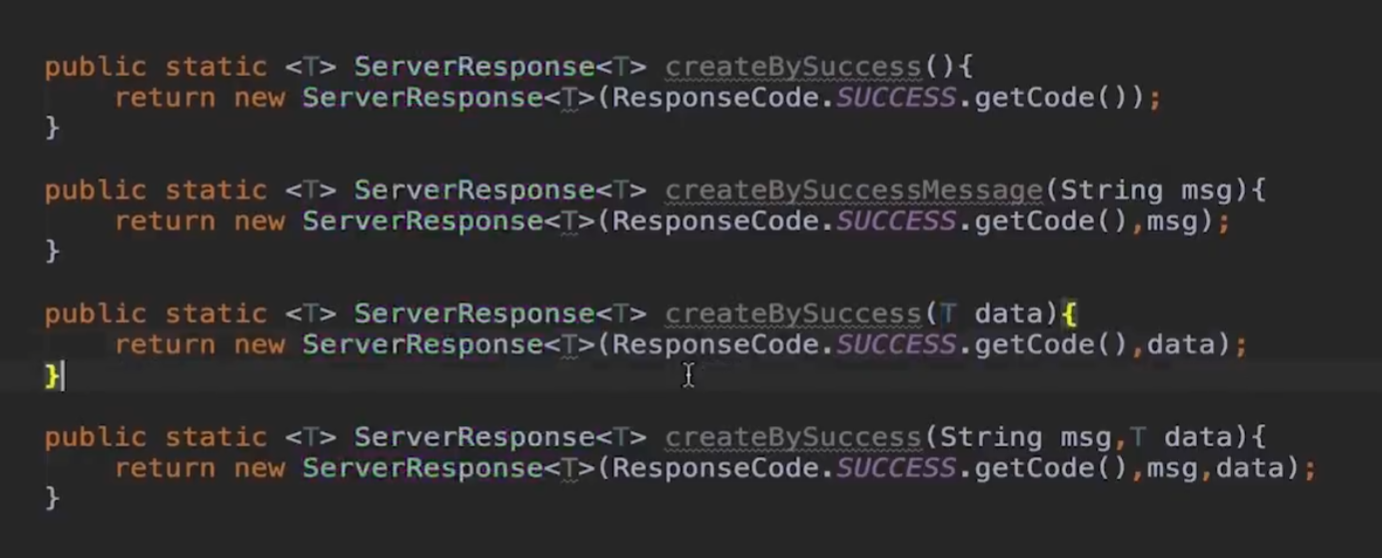
再创建失败时的调用

# 登录功能
 1
 2
 3
 4
 5
 6
 7
 8
 9
10
11
12
13
14
15
16
17
18
19
20
21
22
23
24
25
26
27
|
@startuml
Class Common.ServerResponse {
    - {static} <T> ServerResponse();
    + <T> createBySuccess();
    + <T> createByError();
}
Enum Common.ResponseCode {
    - code
    - desc
    + getters()
}
Class Service.impl.UserServiceImpl {
    - UserMapper
    + login(String username, String pw);
}
Interface Service.IUserService
UserServiceImpl ..|> IUserService

Class Controller.UserController {
    - IUserService
    + ServerResponse<User> login(String username, String password, HttpSession session)
}

UserController --> UserServiceImpl : 调用 service
UserController --> ServerResponse : use
ServerResponse --> ResponseCode : use
@enduml
|
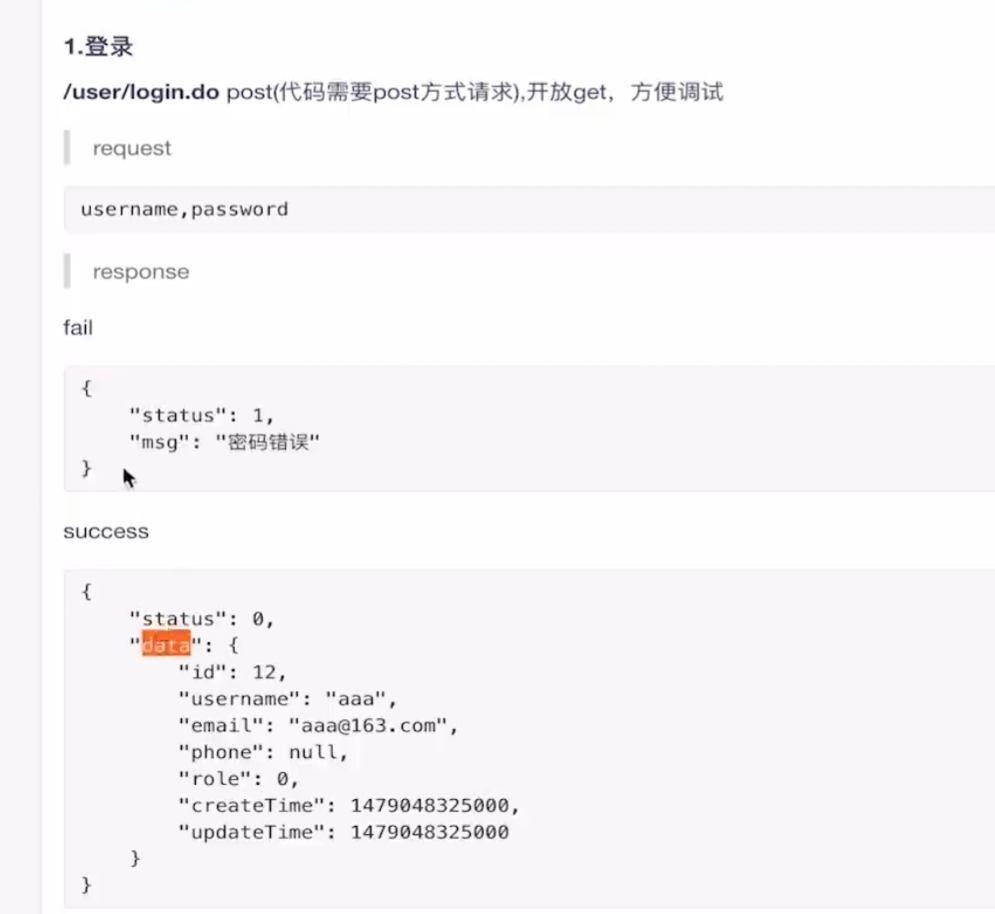
# UserController
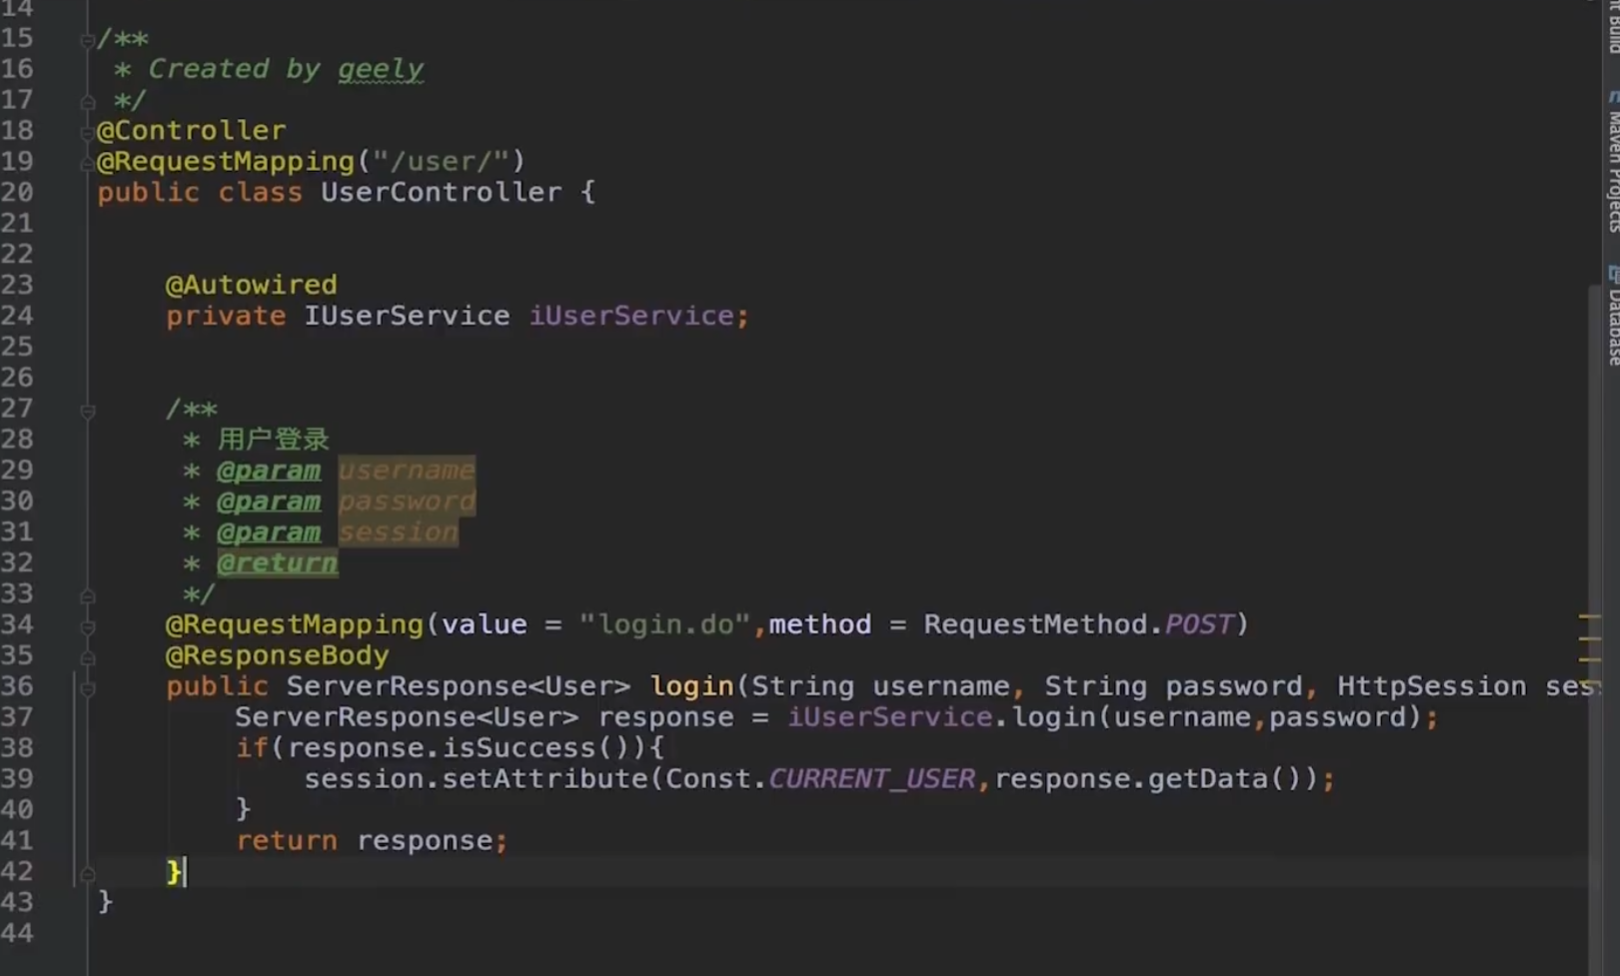
首先在 controller 下创建一个 package portal, 其中创建一个类 UserController
对类添加注解
@Controller@RequestMapping("/user/") 表示我们现在定义的接口是在 /user 路径下
login
- username, pw, HttpSession session
- 返回
ServerResponse<User>
- 注解
@RequestMapping(value = "login.do", method = RequestMethod.POST)@ResponseBody 将返回值序列化为 json, 这是 dispatch-servlet 里配置的 Jackson converter 处理的. 注入的内容是 supportedMediaTypes
# IUserService
在 service 下创建接口 IUserService, 包含 login 方法, login(username, pw) -> Object
# UserServiceImpl
然后 在 service 下创建 impl 包, 创建 实现上面接口的 UserServiceImpl
1
2
|
@Autowired
private UserMapper userMapper;
|
然后去 UserMapper 增加一个 int checkUsername(username);
去到 UserMapper.xml 里改

再增加一个 selectLogin()
1
|
User selectLogin(@Param("username") String username, @Param("password") String password); // Mybatis 传多个参数需要用 @Param, parameterType 写 map
|

有以上的基础就可以实现 login 函数了
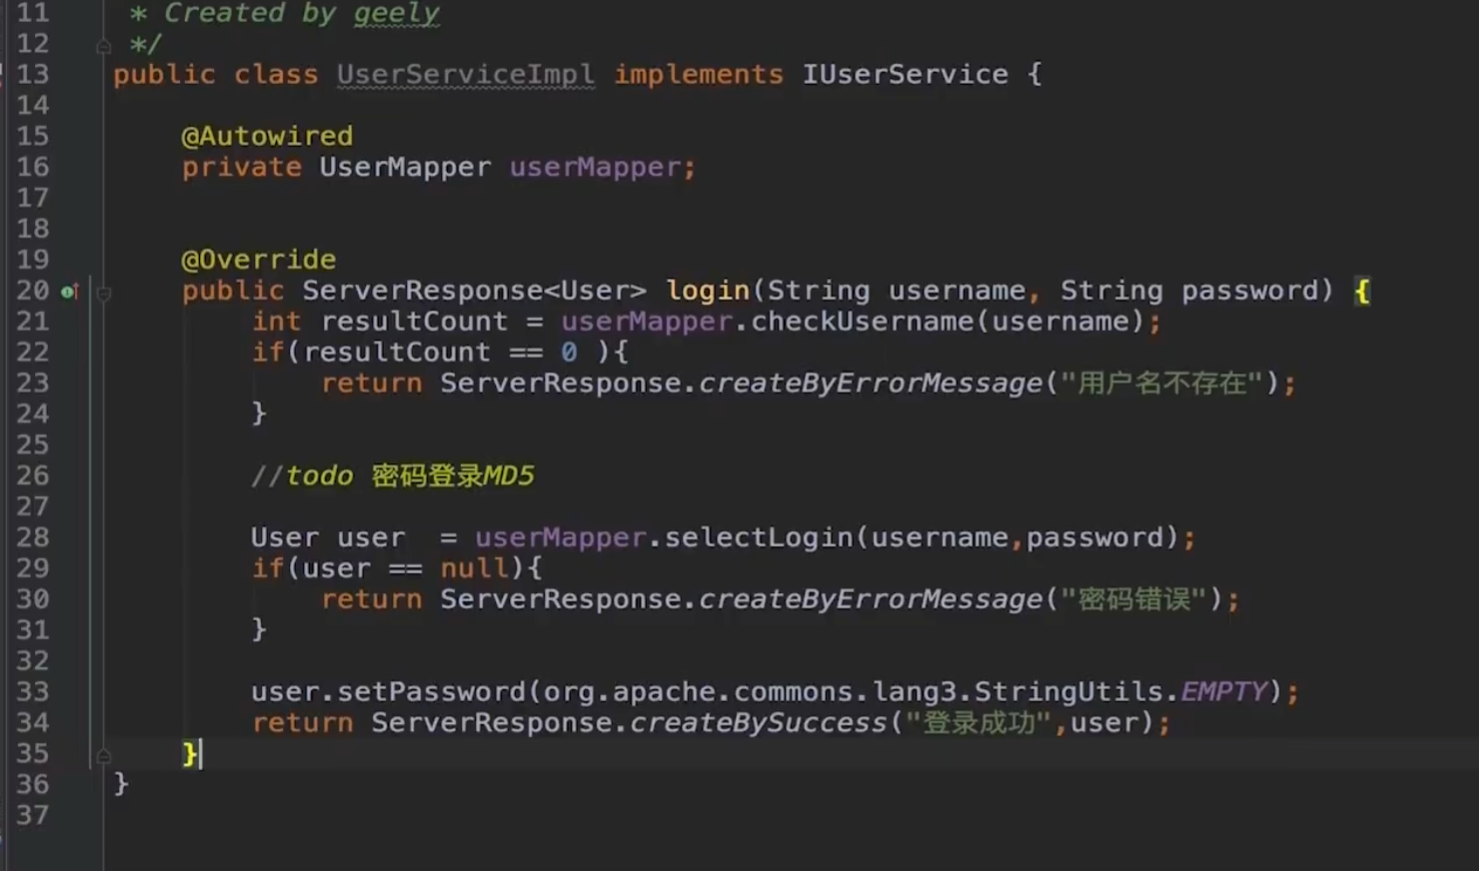
# 注入 Controller
对 impl 类添加注解
@Service("iUserService")
注意小写
对 UserController 类增加参数
1
2
|
@Autowired
private IUserService iUserService;
|
顺便在 Common.Const 写个常量
1
|
public static final String CURRENT_USER = "currentUser";
|
答案也要屏蔽
# 登出接口
登出其实相当于 清除 session

# 注册接口
逻辑需求: 校验用户名是否存在, 校验 email
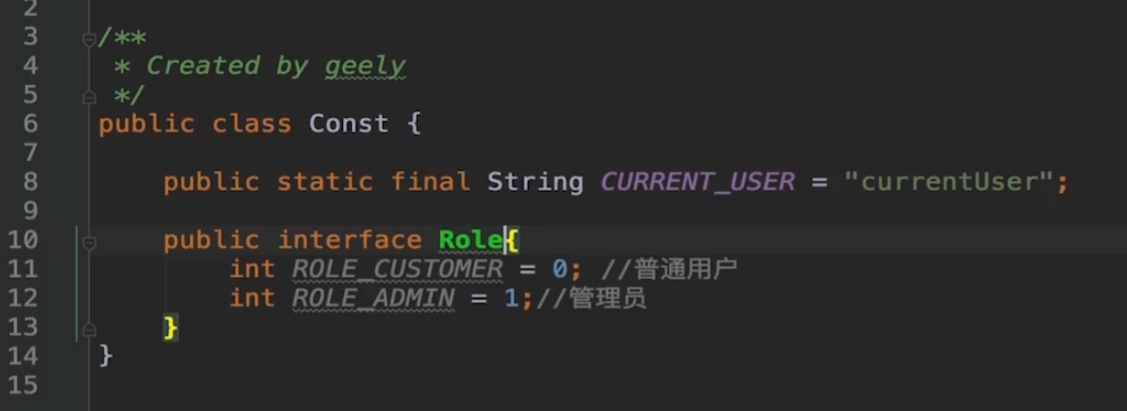
小技巧: 用 interface 分组 Const
直接 copy 了 md5 算法
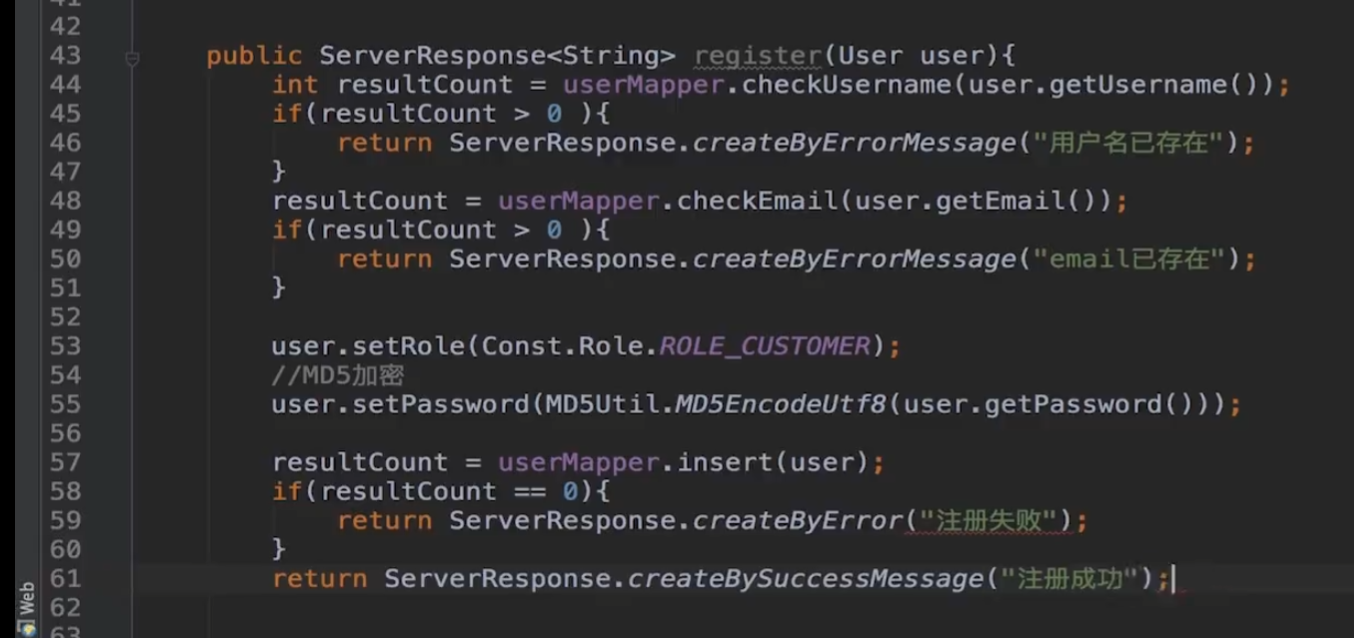
这时候顺便补一下之前的 md5 加密 todo, 再把边角处理一下
# 校验
check_valid.do
写一个 checkValid, 可以检验用户名和邮箱
- String.Utils.isNotBlank(" “) = false;
- String.Utils.isNotEmpty(” “) = true;
其实根据上面的就可以自己写了, 以防万一
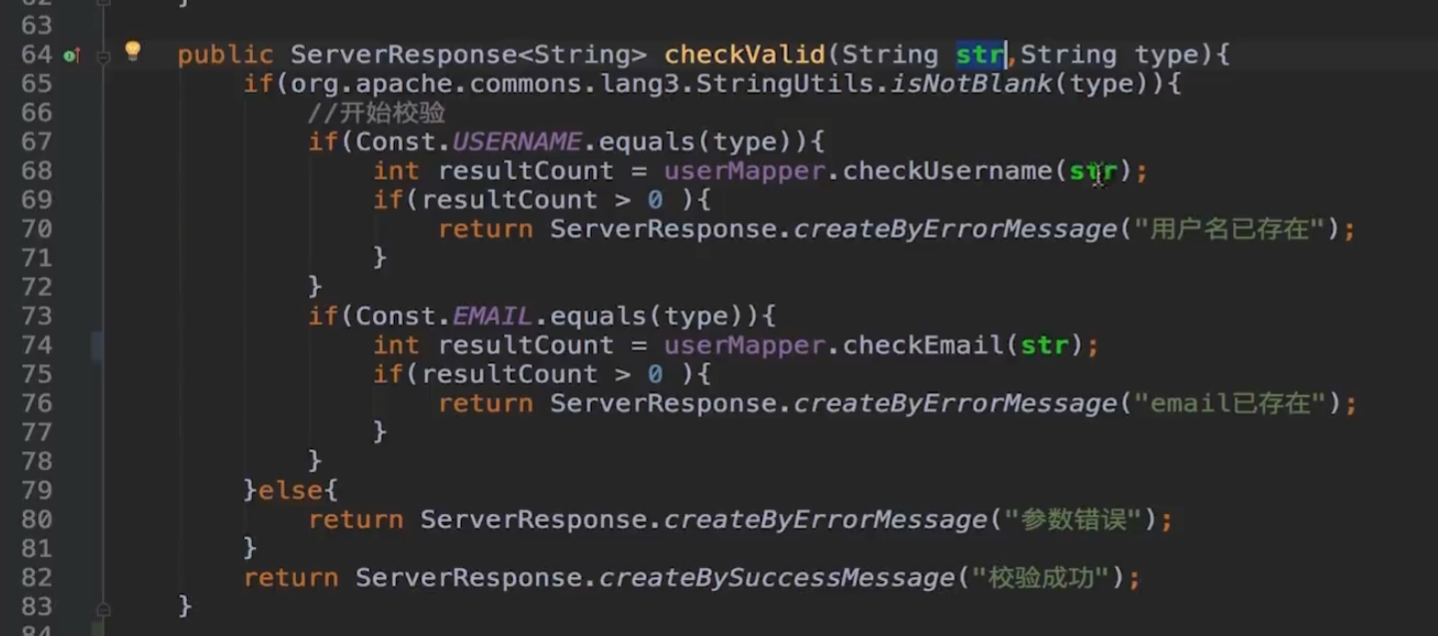
然后可以把这个函数复用到前面的注册
# 获取用户信息

user.setPassword(StringUtils.EMPTY);
答案同理
# 获取提示问题
先检查用户名存在, 再根据用户名从数据库获取问题


# 提问问题与答案

Common.TokenCache, 使用本地缓存

生成一个随机的 UUID 作为 token


# 重置密码


根据讨论区做了一个改进: 密码重置成功使用 LoadingCache 的 invalidate() 方法
TokenCache.removeKey(TokenCache.TOKEN_PREFIX + username);
# 登录状态重置密码

嗯, 然后图中还没有验证是否登录
# 登陆状态更新个人信息


- 防止越权, 从 session 读取 id
- 这里是用户名不可修改的情况
# 获取用户详细信息
- 需要强制登录那种, impl 回传的时候把密码和答案设空
- 例如需要修改信息时, 可以先用这个函数获取

# 后台管理员登录
- controller.backend.UserManageController
- 可以调用前台的登录并加一个 Role 检查

# 加盐
#todo
数据库的存储的密码加了盐,知道被加密后的内容和盐的值,能算出密码是多少吗? - 知乎
mmall.properties 加一条盐值

# 模块测试
首先把 logback.xml, log 位置改一下. 不止截图这一个. 注意权限

如果要在tomcat中为TLD扫描的jar启用调试日志记录,则必须更改tomcat目录中的/conf/logging.properties文件 .
取消注释:
org.apache.jasper.servlet.TldScanner.level = FINE
FINE 级别用于调试日志 .
至少有一个JAR被扫描用于TLD但尚未包含TLD-Java 学习之路
(smartTomcat log 位置又不一样)
How to properly configure Jakarta EE libraries in Maven pom.xml for Tomcat? - Stack Overflow
无果, 下载了个 tomcat 8, 将环境配置项目配置都改了.
发现两个问题, 主配置 mappers/*.xml 写错, 另一个是 sqlSettionFactory(pagehelper) 配错
测试没什么大问题(大概), 有用错重载函数的, 有 sql 写错列名的, 还有一些课程 bug
# 分类模块开发
# 接口列表
- 获取子分类: getCategory(int categoryId)
- 增加节点: addCategory(int parentId, String categoryName)
- 修改分类名: setCategoryName(int parentId, String categoryName)
- 获取当前分类 id 和递归子节点 id: get_deep_category(int categoryId)
backend.CategoryManageController
实用肯定还需要删除, 更新的功能
添加节点: 如果输入的 parentId 不存在?
# 公共
userImpl 写了一个专门检查权限的函数
再创建一个 CategoryServiceImpl (以下省略)
# 增加分类
@RequestParam(value = “parentId”, defaultValue=“0”) int parentId
如果前端没有传值默认 0
要判断用户登录和权限

检查参数后, 新建一个类 insert 进去

# 设置分类名


# 获取子接点(不递归)
getParallelChildrenCategory
用 sql 查就可以了
没有的时候 logger.info() 输出一行日志

 1
 2
 3
 4
 5
 6
 7
 8
 9
10
11
|
@Override
public ServerResponse<List<Category>> getParallelChildrenCategory(Integer categoryId) {
    if (categoryId == null) {
        return ServerResponse.createByErrorMessage("Incorrect parameters.");
    }
    List<Category> categoryList = categoryMapper.selectParalleiChildrenCategory(categoryId);
    if (CollectionUtils.isEmpty(categoryList)) {
        logger.info("No children category found.");
    }
    return ServerResponse.createBySuccess();
}
|
1
2
3
4
5
6
|
<select id="selectParalleiChildrenCategory" resultMap="BaseResultMap" parameterType="java.lang.Integer" >
select
<include refid="Base_Column_List" />
from mmall_category
where parent_id = #{parentId, jdbcType=INTEGER}
</select>
|
# 获取子节点(递归)
 1
 2
 3
 4
 5
 6
 7
 8
 9
10
11
12
13
14
15
16
17
18
19
20
21
|
@Override
public ServerResponse getRecursiveChildrenCategory(Integer categoryId) {
    if (categoryId == null) {
        return ServerResponse.createByErrorMessage("Incorrect parameters.");
    }
    List<Integer> categoryIdList = deepSearchChildrenCategory(new ArrayList<Integer>(), categoryId);
    return ServerResponse.createBySuccess(categoryIdList);
}

private List<Integer> deepSearchChildrenCategory(List<Integer> categoryIdList, Integer categoryId) {
    Category category = categoryMapper.selectByPrimaryKey(categoryId);
    if (category != null) {
        categoryIdList.add(category.getId());
    }
    List<Category> subCategoryList = categoryMapper.selectParallelChildrenCategory(categoryId);

    for(Category c:subCategoryList) {
        deepSearchChildrenCategory(categoryIdList, c.getId());
    }
    return categoryIdList;
}
|
# 商品模块开发
# POJO, BO, VO
# 后台新增商品
- backend.ProductManageController
- /manage/product
- IProductService
后台功能全部是强制登录并检查权限的
因为老是查登录和权限很烦, 提取出了函数
updateProduct
后台 updateProduct(Product)
- 将 subImage 第一张设为主图
- 根据传入数据是否有 id 判断是新增还是更新
# 后台商品上下架
setSaleStatus(Integer productId, Integer status)
调用接口处 <C+T> 可以直接转到实现
这时候用 IllegalArgument 了
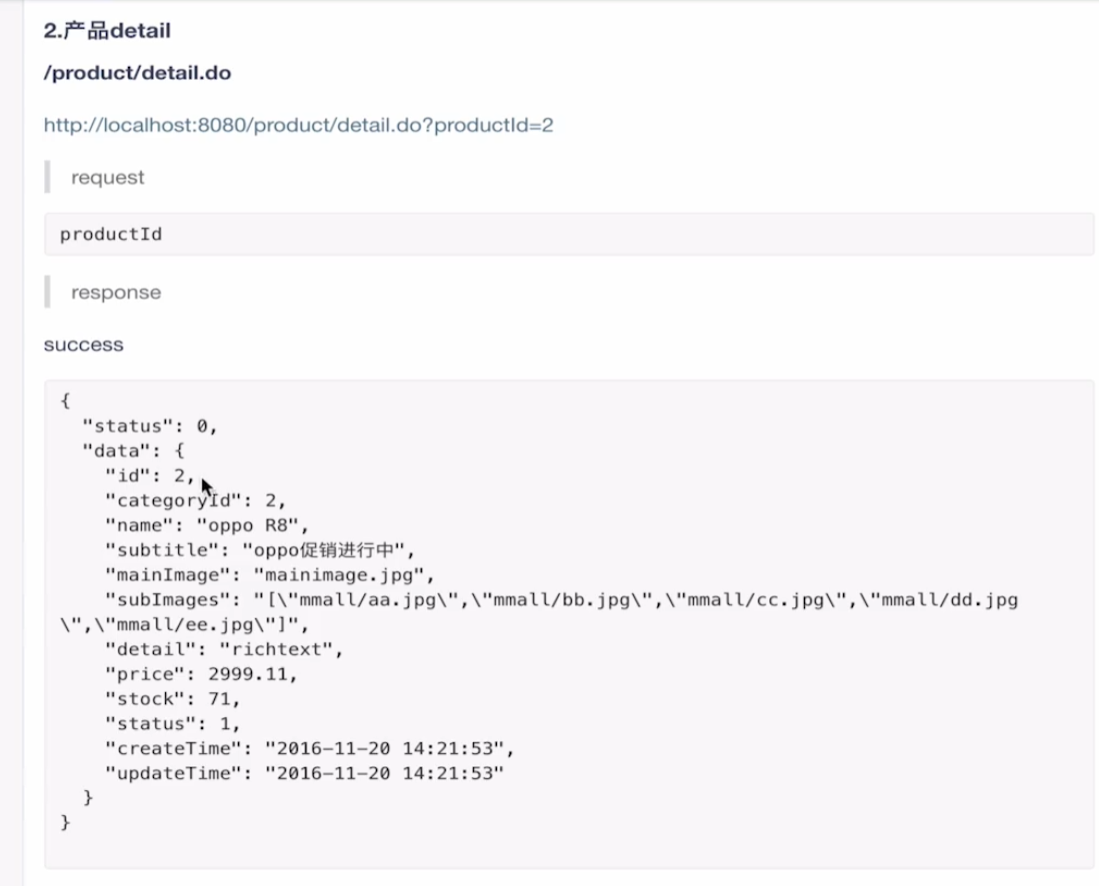
# 商品详情
getDetail(productId)
vo.ProductDetailVo + gettersetter

 host 从配置中获取, 不要硬编码
static 块, 在类初始化时会执行一次, 一般用来初始化类变量,
static {…} -> {…} -> Constructor
用 forname 加载 com.mysql.jdbc.Driver 会执行 这个类里的 static 块
写 PropertiesUtil, new Properties(), 写两个读取方法, 其中一个带默认值
然后 DateUtil, 毫秒 Timestamp 和 yyyyMMddhhmmss 互转
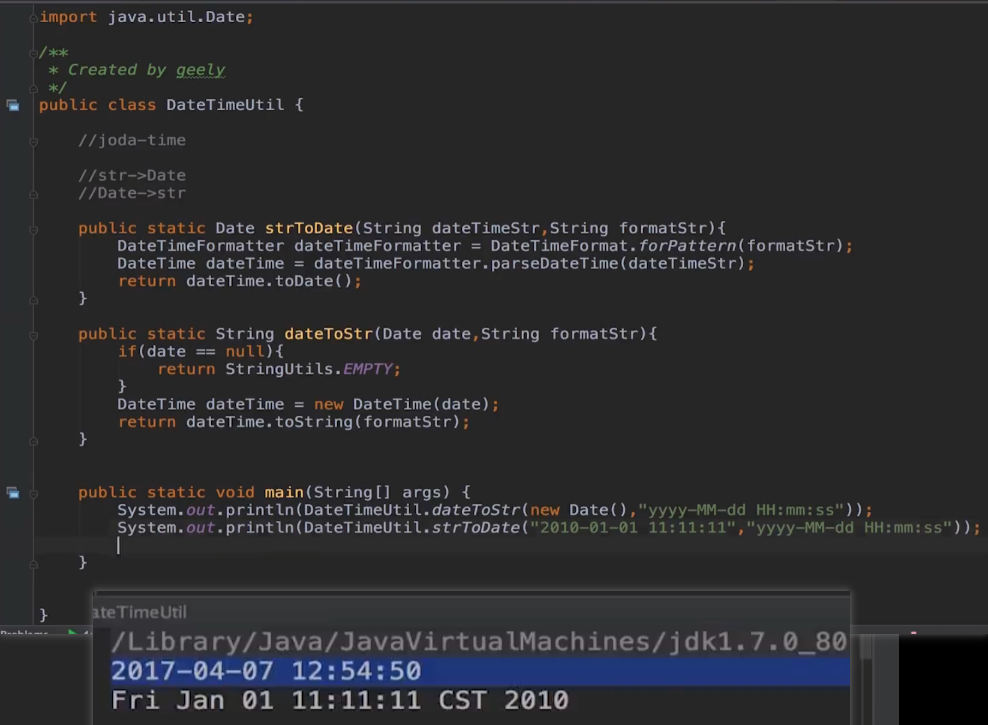 但我想拿 java.time.LocalDateTime 写. 似乎要大费周章


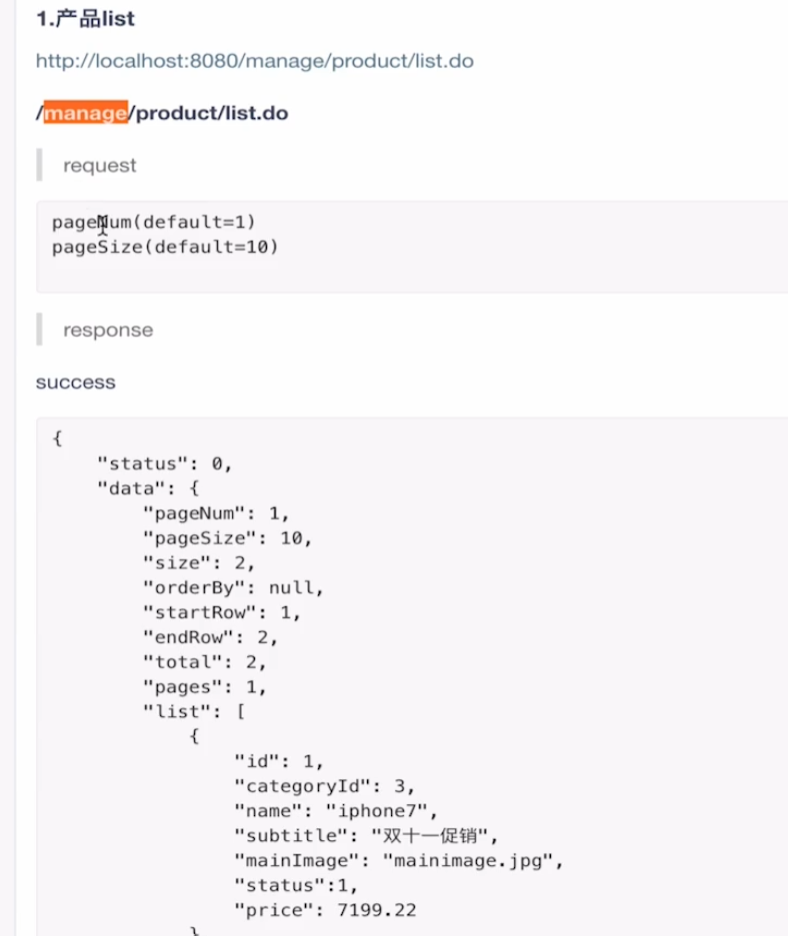
# 后台商品 list
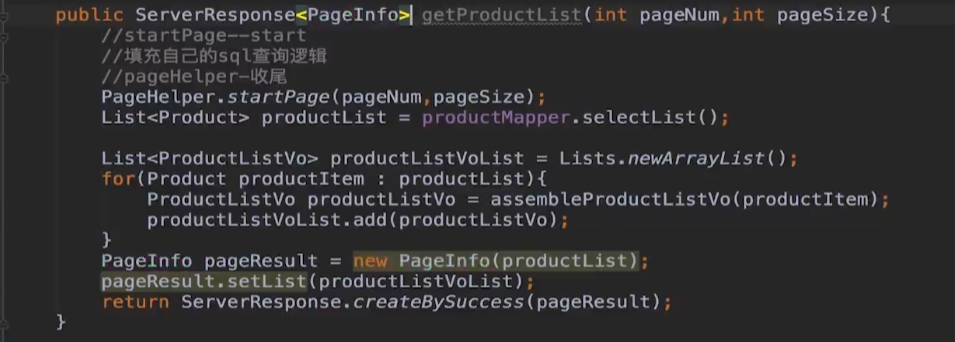
page-helper 是用 aop 实现的
使用
- startPage(), 点进去可以看, 注释非常完善
- 填充 sql 逻辑
- pageHelper
 pagehelper 用的 sql 不要写分号, 会自动 aop 注入 limit 10 offset 1
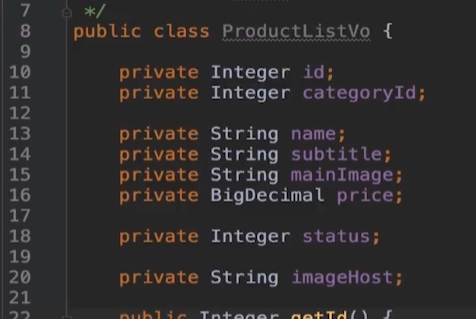
ProductListVo 和组装方法
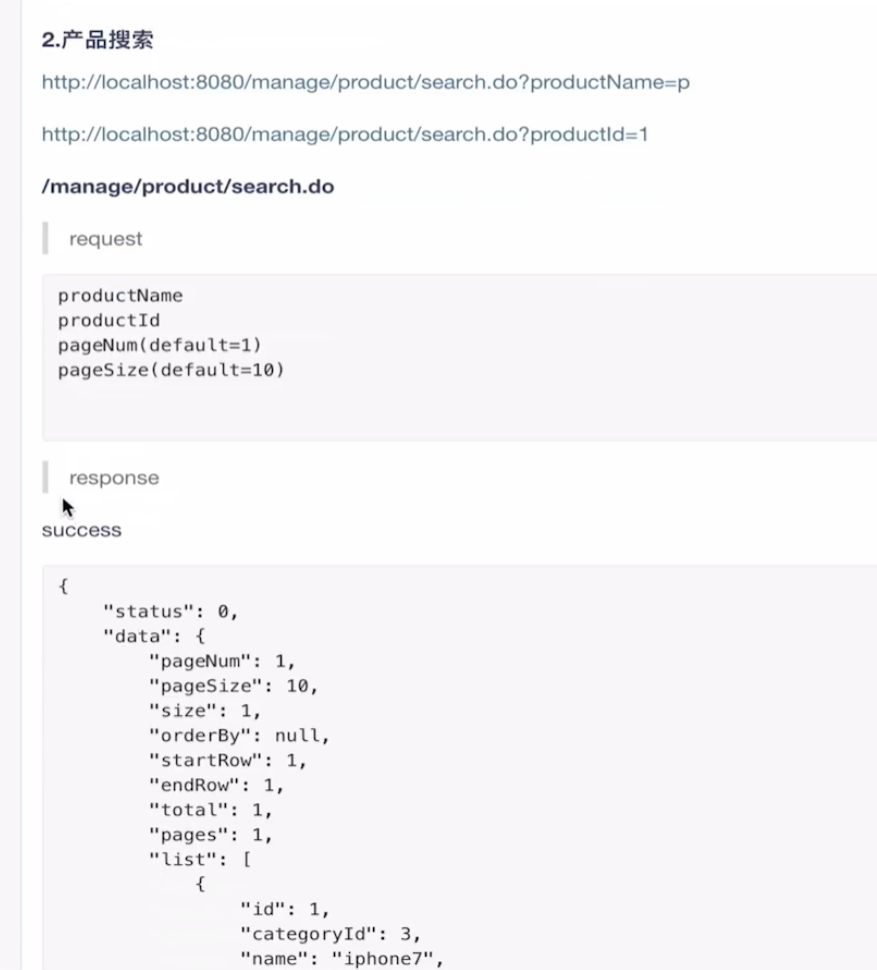
# 后台搜索


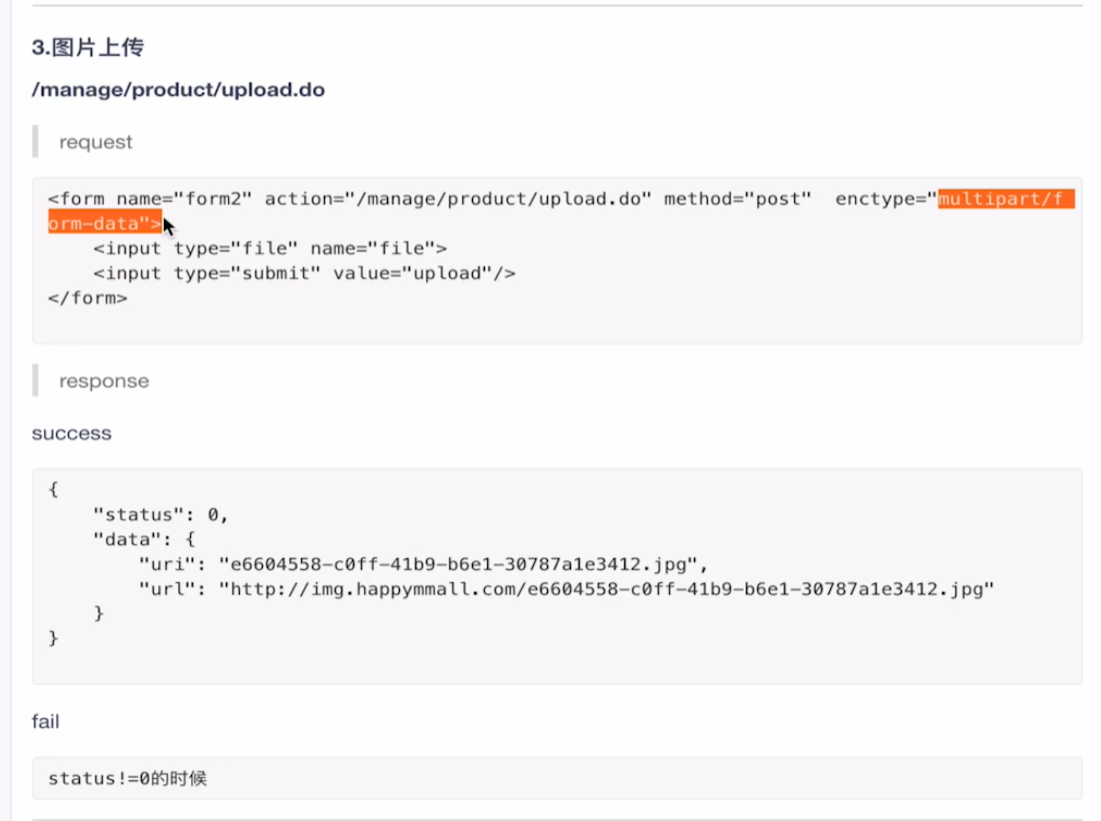
# 后台文件上传
SpringMVC 的 上传文件类型是Multipartfile
FileServiceImpl
 1
 2
 3
 4
 5
 6
 7
 8
 9
10
11
12
13
14
15
16
17
18
19
20
21
22
23
|
public String upload(MultipartFile file, String path) {
    String originalFilename = file.getOriginalFilename();
    String fileExtensionName = originalFilename.substring(originalFilename.lastIndexOf(".") + 1);
    String targetFilename = UUID.randomUUID() + "." + fileExtensionName; // filename on the server
    logger.info("Start uploading file: original name: {}, upload path: {}, new file name: {}", originalFilename,
            path, targetFilename);

    File targetDir = new File(path);
    if (!targetDir.exists()) {
        targetDir.setWritable(true);
        targetDir.mkdir();
    }
    File targetFile = new File(path, targetFilename);

    try {
        file.transferTo(targetDir); // 上传到项目里面
        FTPUtil.uploadFile(Lists.newArrayList(targetFile), "img"); // 上传到服务器
        targetFile.delete(); // 删除项目的文件
    } catch (IOException e) {
        logger.error("Upload file error.");
        return null;
    }
    return targetFile.getName();
|
FileUtil
 1
 2
 3
 4
 5
 6
 7
 8
 9
10
11
12
|
private boolean connectServer(String ip, int port, String user, String pass) {
    boolean isSuccess = false;
    ftpClient = new FTPClient();
    try {
        ftpClient.connect(ip);
        isSuccess = ftpClient.login(user, pass);
    } catch (IOException e) {
        logger.error("Connect server error", e);
    }

    return isSuccess;
}
|
 1
 2
 3
 4
 5
 6
 7
 8
 9
10
11
12
13
14
15
16
17
18
19
20
21
22
23
24
25
26
27
28
29
30
31
32
|
private boolean uploadFile(String remotePath, List<File> fileList) throws IOException {
    boolean isSuccess = false;
    FileInputStream fis = null;

    if (connectServer(this.ip, this.port, this.user, this.pass)) {
        try {
            // Settings
            ftpClient.changeWorkingDirectory(remotePath);
            ftpClient.setBufferSize(1024);
            ftpClient.setControlEncoding("UTF-8");
            ftpClient.setFileType(FTPClient.BINARY_FILE_TYPE);
            ftpClient.enterLocalPassiveMode();

            // upload
            for (File fileItem : fileList) {
                fis = new FileInputStream(fileItem);
                ftpClient.storeFile(fileItem.getName(), fis);
            }

            isSuccess = true;

        } catch (IOException e) {
            logger.error("Upload file error", e);
            e.printStackTrace();
        } finally {
            fis.close();
            ftpClient.disconnect();
        }
    }

    return isSuccess;
}
|
1
2
3
4
5
6
7
|
public static boolean uploadFile(List<File> fileList, String path) throws IOException {
    FTPUtil ftpUtil = new FTPUtil(ftpIp, 21, ftpUser, ftpPass);
    logger.info("Uploading file, connecting FTP server.");
    boolean result = ftpUtil.uploadFile(path, fileList);
    logger.info("Uploading file, result: {}", result);
    return result;
}
|
Controller
 1
 2
 3
 4
 5
 6
 7
 8
 9
10
11
12
13
14
15
16
17
18
19
|
@RequestMapping(value = "upload.do", method = RequestMethod.POST)
@ResponseBody
public ServerResponse upload(HttpSession session, @RequestParam(value = "upload_file", required = false) MultipartFile file, HttpServletRequest request) {

    User user = (User) session.getAttribute(Const.CURRENT_USER);
    ServerResponse<String> checkResponse = iUserService.checkLoginAndAdmin(user);
    if (!checkResponse.isSuccess()) {
        return checkResponse;
    }

    String path = request.getSession().getServletContext().getRealPath("upload"); // 上传到 /resources/webapp/upload
    String targetFilename = iFileService.upload(file, path);
    String url = PropertiesUtil.getProp("ftp.server.http.prefix") + targetFilename;

    Map fileMap = Maps.newHashMap();
    fileMap.put("uri", targetFilename);
    fileMap.put("url", url);
    return ServerResponse.createBySuccess(fileMap);
}
|
# 配置部分
dispatcher-servlet 的 MultipartResolver
# 上传测试
index.jsp
<C-S-N> 查找文件
1
2
3
4
|
<form name="test-springmvc-upload-file" action="/mmall_learning/manage/product/upload_image.do" method="post" enctype="multipart/form-data">
    <input type="file" name="upload_file" />
    <input type="submit" value="Upload" />
</form>
|
# 后台富文本上传
和图片上传的逻辑相似, 使用的是 simditor
Options - Simditor
json 返回要求 用 Map 返回
1
2
3
4
5
|
{
  "success": true/false,
  "file_path": "[real file path]",
  "msg": "error message" # optional
}
|
 1
 2
 3
 4
 5
 6
 7
 8
 9
10
11
12
13
14
15
16
17
18
19
20
21
22
23
24
25
26
27
28
29
|
@RequestMapping(value = "rtf_upload_image.do", method = RequestMethod.POST)
@ResponseBody
public Map rtfUploadImage(HttpSession session, @RequestParam(value = "upload_file", required = false) MultipartFile file,
                          HttpServletRequest request, HttpServletResponse response) {
    Map resultMap = Maps.newHashMap();

    User user = (User) session.getAttribute(Const.CURRENT_USER);
    ServerResponse<String> checkResponse = iUserService.checkLoginAndAdmin(user);
    if (!checkResponse.isSuccess()) {
        resultMap.put("success", false);
        resultMap.put("msg", "Not login or no privilege.");
    }

    String path = request.getSession().getServletContext().getRealPath("upload"); // 上传到 /resources/webapp/upload
    String targetFilename = iFileService.upload(file, path);
    String url = PropertiesUtil.getProp("ftp.server.http.prefix") + targetFilename;

    if (targetFilename == null) {
        resultMap.put("success", false);
        resultMap.put("msg", "Upload file failed.");
    } else {
        resultMap.put("success", true);
        resultMap.put("msg", "Upload succeeded.");
        resultMap.put("file_path", url);
        response.addHeader("Access-Control-AllowHeaders", "X-File-Name"); // requested by Simditor
    }

    return resultMap;
}
|
servlet response 加 header
# 测试
1
2
3
4
|
<form name="test-rtf-upload-file" action="/mmall_learning/manage/product/rtf_upload_image.do" method="post" enctype="multipart/form-data">
    <input type="file" name="upload_file" />
    <input type="submit" value="Upload" />
</form>
|
然后 这句报错, 发现是自己把类名写错了
1
|
props.load(new InputStreamReader(PropertiesUtil.class.getClassLoader().getResourceAsStream(filename), "UTF-8"));
|
# 前台商品详情和搜索
ProductController
前台的方法都不需要验证
 "”
"”
Const


获取详情基本上可以复用, 要多一个判断是否在售
排序
- categoryId 为空时, 返回空分页, 不报错

处理约定和 sql 语句的差异

Untitled Diagram.svg
多 category 的处理, foreach 在 xml 的用法

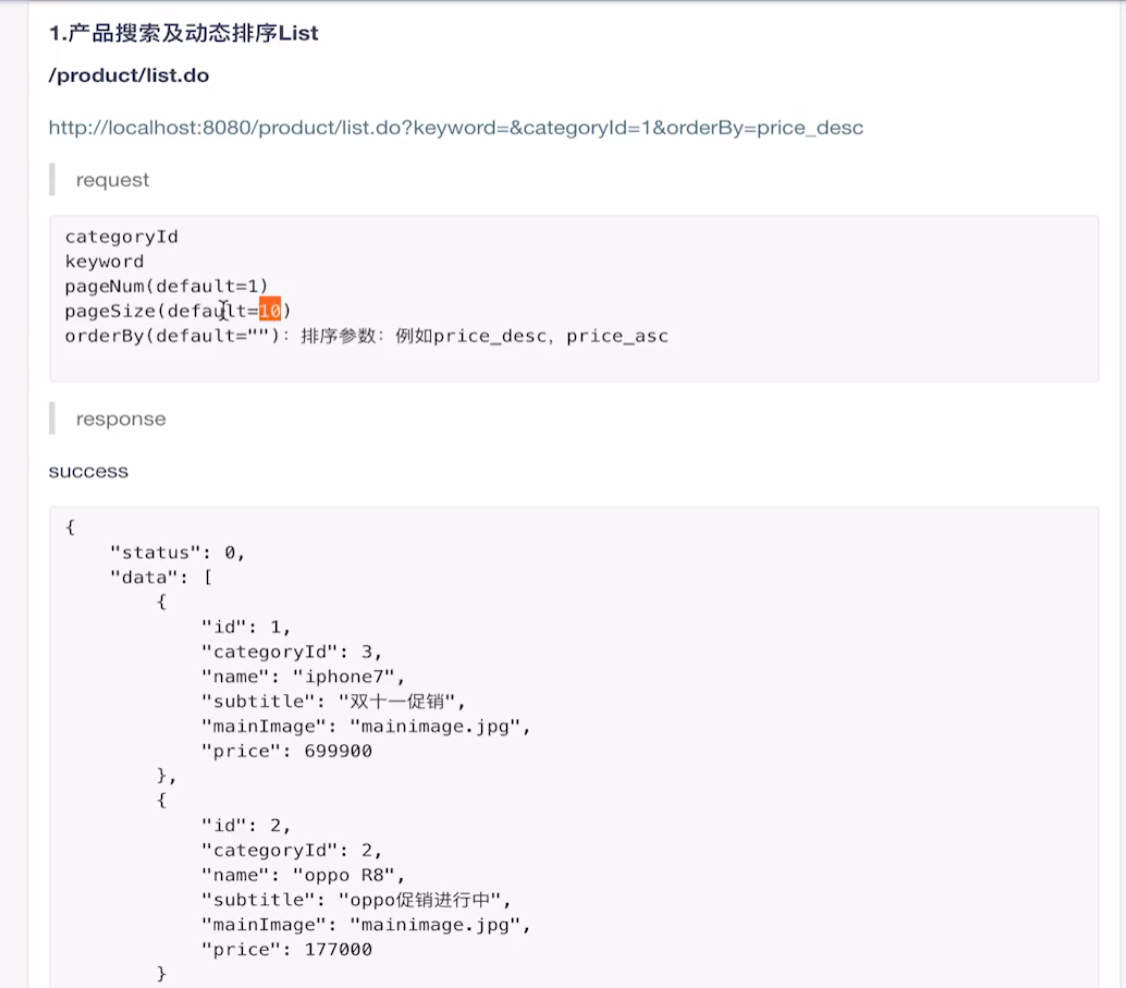
# 接口
前
 后
后

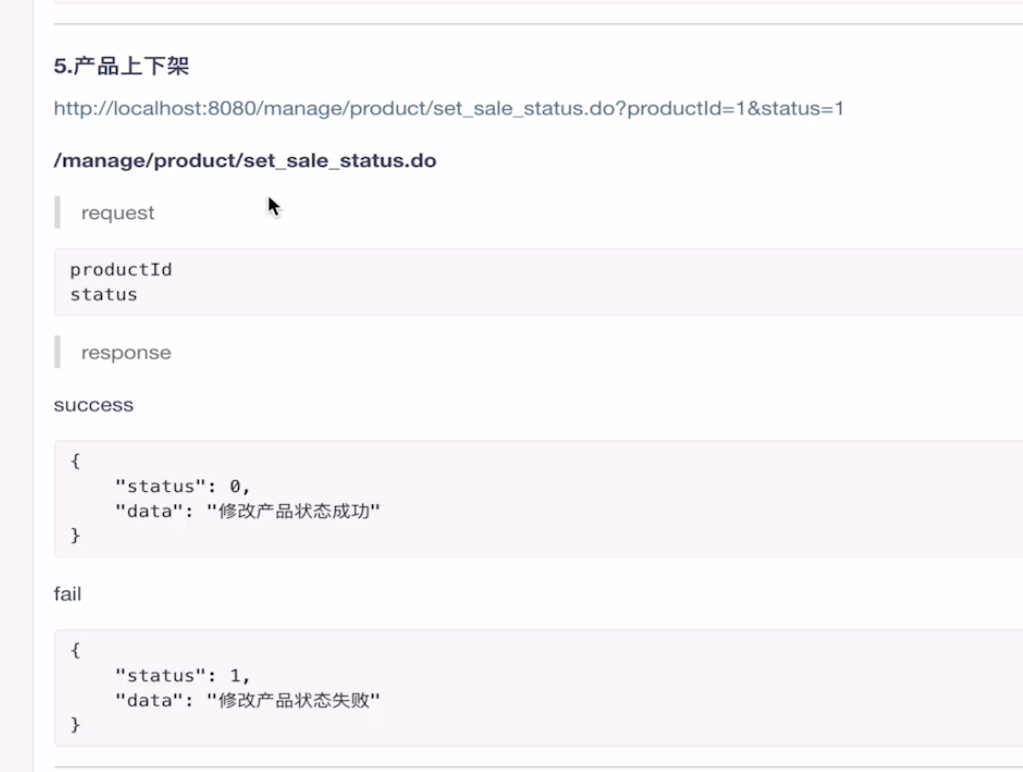
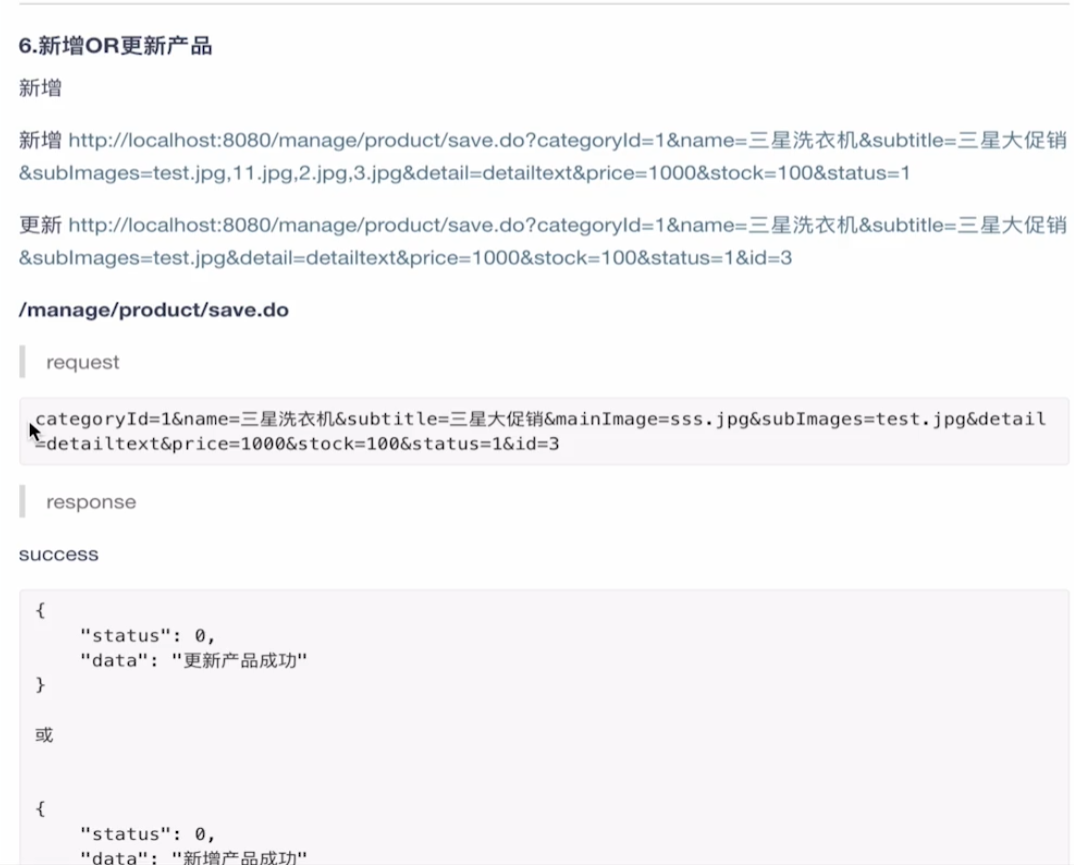
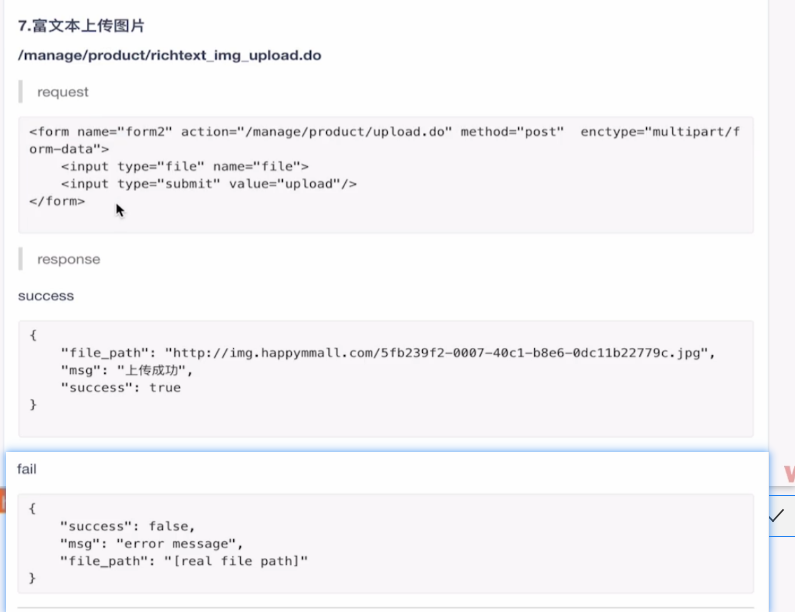
# 商品模块测试
试着缺少各个参数, 自己添加了很多 @RequestParam
后台的 search 方法挺怪的, 感觉很不实用
然后发现 insertselective 是没有加 createTime 的, 又去改
# 购物车模块开发
# 接口

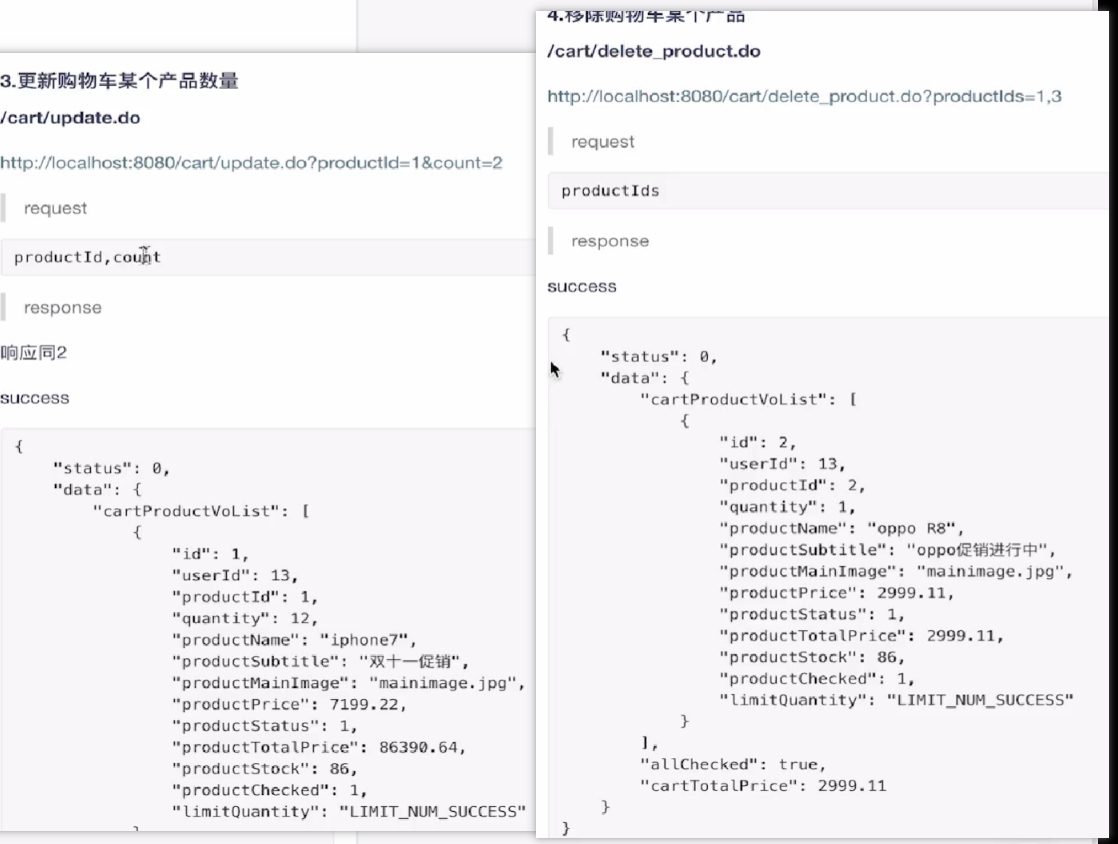
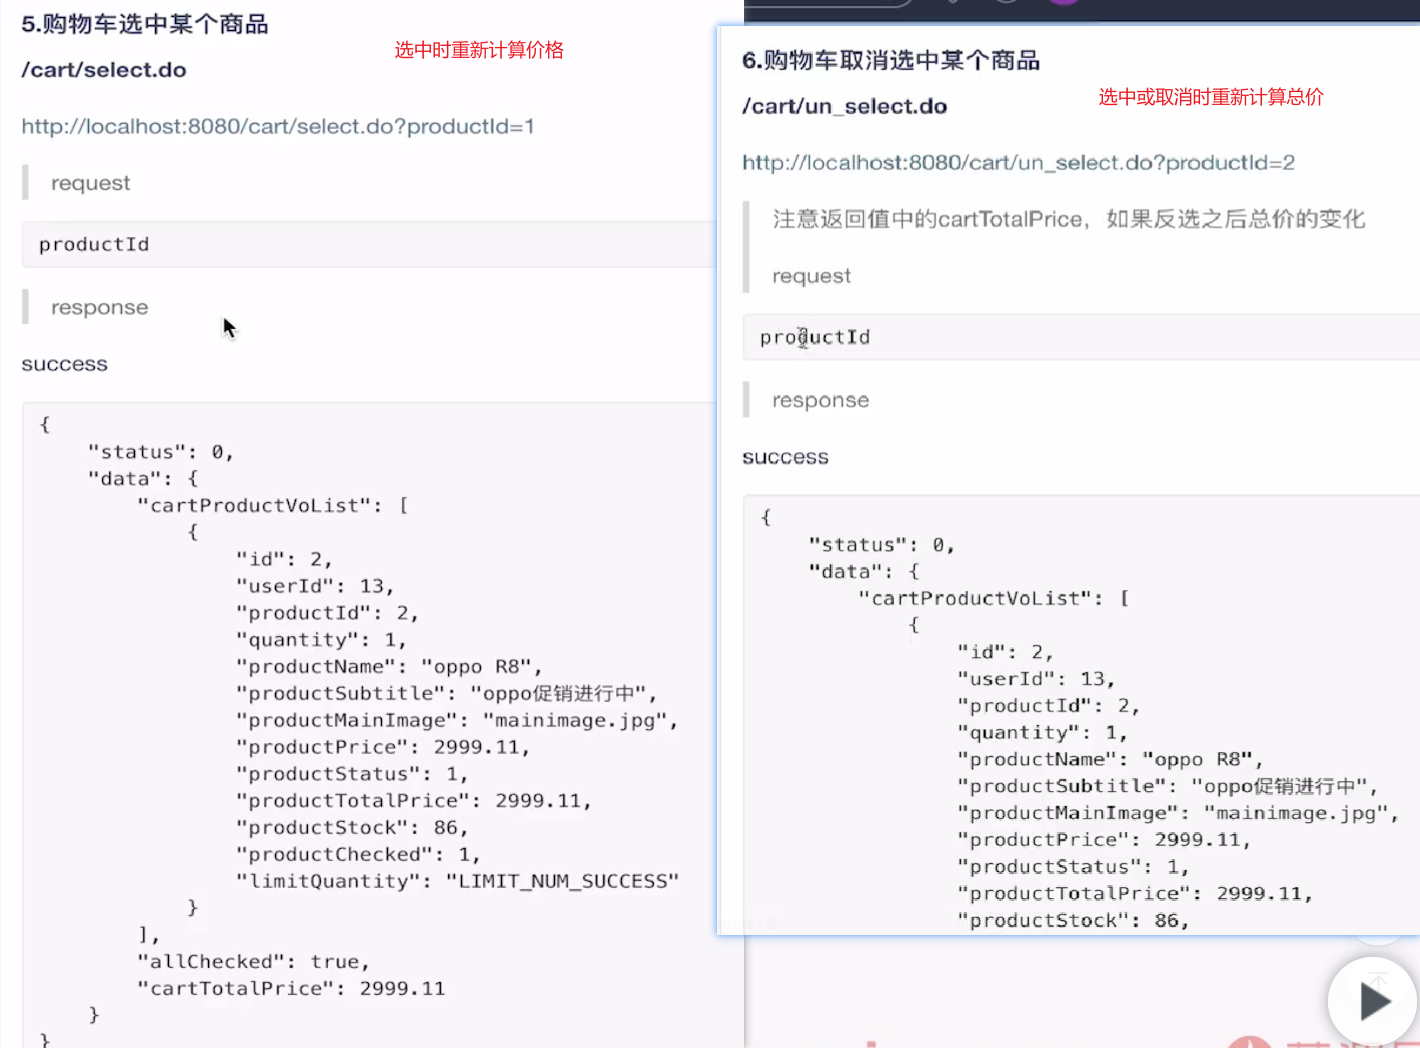
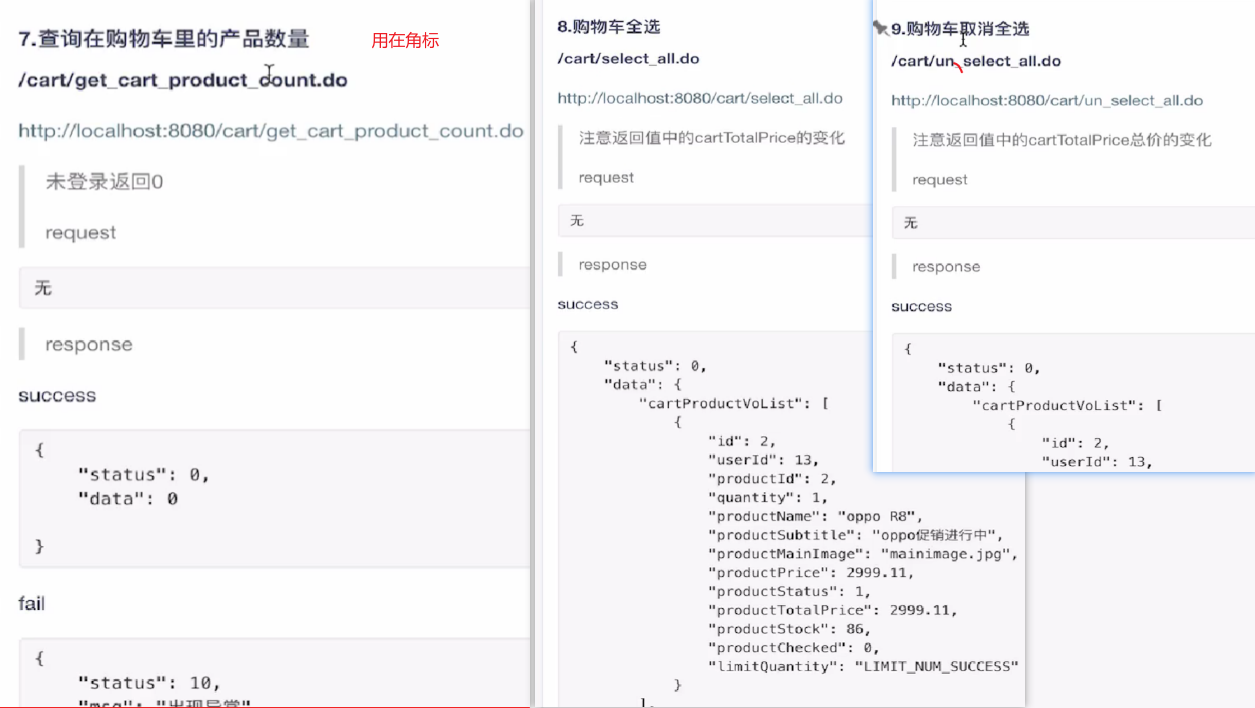
# 核心方法, vo, util
# CartProductVo
 1
 2
 3
 4
 5
 6
 7
 8
 9
10
11
12
13
14
15
|
public class CartProductVo {
    private Integer id;
    private Integer userId;
    private Integer productId;
    private Integer quantity;
    private String productName;
    private String productSubtitle;
    private String productMainImage;
    private BigDecimal price;
    private BigDecimal totalPrice;
    private Integer stock;
    private Integer status;
    private Integer checked;
    private String limitQuantity; // success: quantity under stock
}
|
# CartVo
1
2
3
4
5
6
|
public class CartVo {
    private List<CartProductVo> cartProductVoList;
    private BigDecimal cartTotalPrice;
    private Boolean allChecked; // 这样前端能知道全选按钮能不能用
    private String imageHost;
}
|
# BigDecimalUtil
实现一下 BigDecimalUtil 类的 static 加减乘除方法, 注意除法的舍入问题
1
2
3
4
5
|
public static BigDecimal div(double v1, double v2) {
    BigDecimal b1 = new BigDecimal(Double.toString(v1));
    BigDecimal b2 = new BigDecimal(Double.toString(v2));
    return b1.divide(b2, 2, RoundingMode.HALF_UP); // 四舍五入
}
|
# Const

# assembleCartProductVo
除了组装属性, 还需要
改进: 应当避免或减少循环中的 sql 操作
Mybatis实现多表联查_mybatis多表联查-CSDN博客
select 方法和 resultMap
 1
 2
 3
 4
 5
 6
 7
 8
 9
10
11
12
13
|
<select id="selectCartProductVoByCartItemIds" parameterType="java.util.List" resultMap="CartProductVoMap">
select
c.id `mmall_cart.id`, user_id, product_id, quantity, name, subtitle, main_image, price, 0 as zero, stock, status, checked, "" as lm
from mmall_cart c left join mmall_product p on c.product_id = p.id
<where>
  <if test="cartItemIdList != null">
    and c.id in
    <foreach collection="cartItemIdList" open="(" separator="," close=")" item="item" index="index" >
      #{item}
    </foreach>
  </if>
</where>
</select>
|
注意 association 必须放后面(顺序问题可以通过报错看到), 并且加几个 sel 方法要联查的表
 1
 2
 3
 4
 5
 6
 7
 8
 9
10
11
12
13
14
15
|
<resultMap id="CartProductVoMap" type="com.mmall.vo.CartProductVo">
    <id column="mmall_cart.id" property="id" javaType="java.lang.Integer" jdbcType="INTEGER" />
    <result column="user_id" property="userId" javaType="java.lang.Integer" jdbcType="INTEGER" />
    <result column="product_id" property="productId" javaType="java.lang.Integer" jdbcType="INTEGER" />
    <result column="quantity" property="quantity" javaType="java.lang.Integer" jdbcType="INTEGER" />
    <result column="price" javaType="java.math.BigDecimal" jdbcType="DECIMAL" />
    <result column="zero" property="totalPrice" javaType="java.math.BigDecimal" jdbcType="DECIMAL" />
    <result column="stock" javaType="java.lang.Integer" jdbcType="INTEGER" />
    <result column="status" javaType="java.lang.Integer" jdbcType="INTEGER" />
    <result column="checked" javaType="java.lang.Integer" jdbcType="INTEGER" />
    <result column="lm" property="limitQuantity" />
    <association property="productName" javaType="java.lang.String" jdbcType="VARCHAR" select="com.mmall.dao.ProductMapper.selNameById" column="product_id" />
    <association property="productSubtitle" javaType="java.lang.String" jdbcType="VARCHAR" select="com.mmall.dao.ProductMapper.selSubtitleById" column="product_id" />
    <association property="productMainImage" javaType="java.lang.String" jdbcType="VARCHAR" select="com.mmall.dao.ProductMapper.selMainImageById" column="product_id" />
</resultMap>
|
vo 对象要 constructor 给各属性赋值
# 接口方法
# add, update_count
![[attachments/Pasted image 20240123181519.png]]
注意一下空判断就好
# remove
接口是传 String productIds, 写一个 sql
# getCartProductCount
1
2
3
|
  <select id="selectCartProductCount" parameterType="int" resultType="int">
    select IFNULL(sum(quantity),0) as count from mmall_cart where user_id = #{userId}
  </select>
|
# select
1
2
3
4
5
6
7
8
9
|
  <update id="checkedOrUncheckedProduct" parameterType="map">
    UPDATE  mmall_cart
    set checked = #{checked},
    update_time = now()
    where user_id = #{userId}
    <if test="productId != null">
      and product_id = #{productId}
    </if>
  </update>
|
参考这个就可以处理所有单选和全选
# 地址模块开发, 防止横向越权
# 接口
![[attachments/Pasted image 20240131134024.png]]
# 接口方法
# add
![[attachments/Pasted image 20240131135819.png]]
注意对象绑定, 返回值 data 需要 用 Map
# delete 安全漏洞
不能直接用自动生成的方法, 要同时判断 userId 和 shippingId
# 订单模块开发
# 接口设计
![[attachments/Pasted image 20240208122034.png]]
组合索引是为了提高效率
前台
![[attachments/Pasted image 20240208123835.png]]
![[attachments/Pasted image 20240208124218.png]]
后台
![[attachments/Pasted image 20240208124452.png]]
# 备忘
# Mybatis-generator 改动
1
2
3
|
<javaTypeResolver>
    <property name="useJSR310Types" value="true"/>
</javaTypeResolver>
|
如果重新生成, 要把之前的 xml 删除. generator 并不考虑已经存在 xml 的 sql 方法, 所以极大可能出现重名方法报错
# xml 改动
- java.util.Date -> java.time.LocalDateTime
- create time 和 update time 都用 now()
- insert selective 的 create time, update time 所有 if 去掉
- sql update 方法 不改变 create time. update time 的 if 去掉
1
2
3
|
%s/java.util.Date/java.time.LocalDateTime/g
%s/#{createTime,jdbcType=TIMESTAMP}/now()/g
%s/#{updateTime,jdbcType=TIMESTAMP}/now()/g
|
:模式下用<C+r> + 寄存器粘贴
# 关于转 JRS310
mybatis 默认处理 sql Datetime 类型用的是 java.utils.Date, 但这个类已经是 deprecated, 转为 LocalDate 方法见下
Java 8 LocalDate mapping with mybatis - Stack Overflow
通过 mybatis-generator 的话, 这个办法可行(这时也改了 mybatis + generator 两者的版本号)
datetime - SQL Server type to generate Instant in Mybatis Generator - Stack Overflow
更好的方法:
1
2
3
|
<javaTypeResolver>
    <property name="useJSR310Types" value="true"/>
</javaTypeResolver>
|
MyBatis Generator Core – The <javaTypeResolver> Element
接下来就是漫长的修复
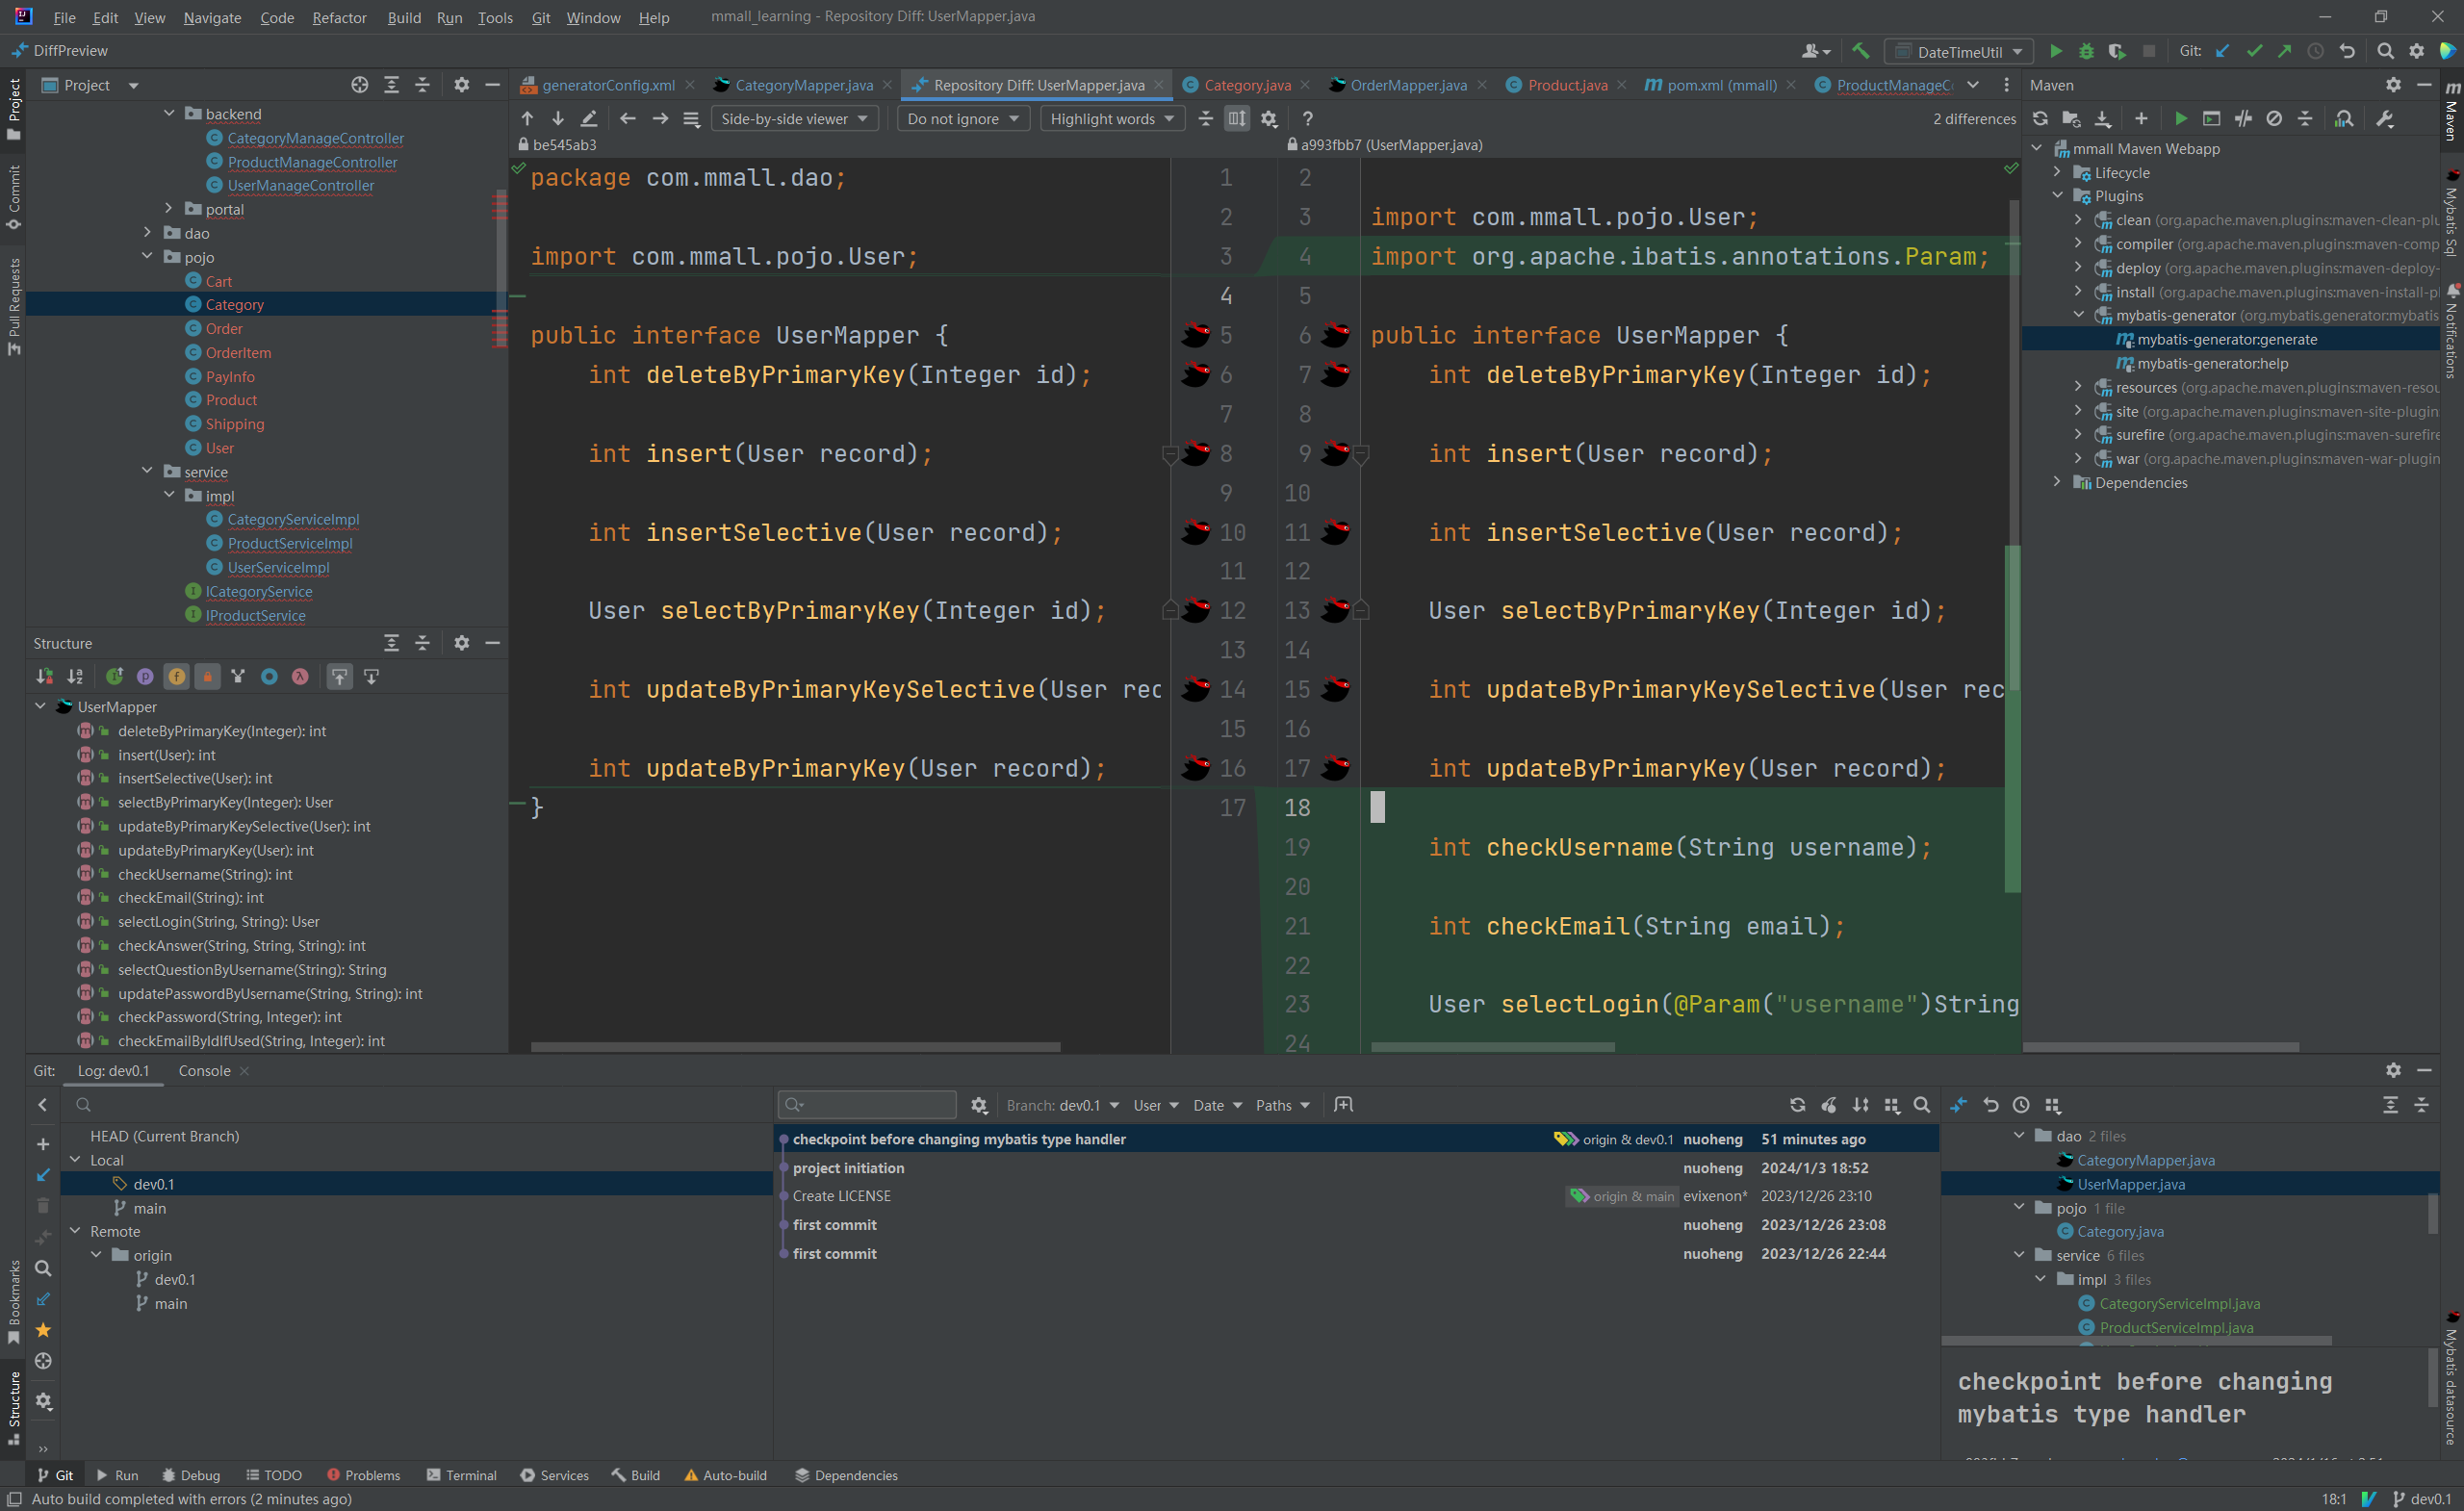
Mybatis报错 Result Maps collection already contains value for 原因汇总-CSDN博客
# 商业运算中的精度问题
Java 本身没有专门处理货币的类, 但可以用 BigDecimal 类 处理浮点数的精度问题.
1
2
|
BigDecimal b1 = new BigDecimal("0.01"); // 一定要用 String 参数的构造器
BigDecimal b1 = new BigDecimal(Double.toString(num1));
|
# 多表联查
Mybatis实现多表联查_mybatis多表联查-CSDN博客
详细状况见
# SpringMVC 对象绑定
# sql insert 语句返回值


 catalina.out 和 catalina.log 的区别和用途_.out是什么日志-CSDN博客


 实时 build, 可以在下方 problems 看到实时的问题


 host 从配置中获取, 不要硬编码
 但我想拿 java.time.LocalDateTime 写. 似乎要大费周章

 pagehelper 用的 sql 不要写分号, 会自动 aop 注入 limit 10 offset 1


 "”
"”


 后
后


